
What is keKit?
keKit is a Blender Add-on- keKit provides extensive options for customizing & optimizing workflows
- An all-in-one collection of Scripts/Operators/Pie-Menus for (mostly) modeling-centric workflows.
- Modular - The kit is composed of separate modules that can be enabled or disabled
- At your discretion - No preset shortcuts
How do I use it?
Download & Install / Update
- Download
- Download links & release information availabe HERE
- First Installation
- keKit is an Extension Add-on (since v3.5.1):
- - Install zip-file via Blender prefs "Get Extensions" (install from disk)
- Do not extract zip-file manually
Updating
To avoid potential issues when updating keKit, follow these steps exactly:
- Quit Blender
- Delete the kekit directory in your Extensions dir manually. (Find your path HERE)
- Do extract the new zip-file manually (replacing the deleted dir, not overwriting)
Shortcuts / Tips
- There is no predefined add-on keymap
- You assign whichever operator you like, to whichever shortcut you like
- RMB (Right Mouse Button) on keKit panel items to assign shortcuts
- Assigned keKit shortcuts are listed in keKit Add-on Preferences
- Tips:
- All keKit operators have a direct WIKI link, using Blenders "Online Manual" system:
- - Use F1 or RMB on a keKit menu-item
- Some scripts require a mouse position or other in-viewport action (often indicated by a mouse icon):
- - Assign a temporary shortcut to try it out
- Mouse-over items in the keKit panels for tool-tip descriptions
- Modal keKit Operators will have modal shortcuts displayed in the bottom status bar.
Questions?
- Search the Wiki: There is a lot of information here, and this Wiki is just one big page:
- - Use your browsers page search: CTRL-F / ⌘-F
- For general questions, please read the FAQ.
- If you think you found a bug / need add-on trouble-shooting please use the support page.
- Public feedback & discussions at BlenderArtists
* * *
Settings
Add-On Preferences
Tip: The keKit version nr in the main keKit n-panel is also a direct link to keKit add-on prefs, for quick access.
Tab Locations
Enter a different tab name to relocate keKit in the N-panel.All the keKit modules are appended to the main header: Restart Blender or click "Reload Add-ons To Update" for all the keKit modules to reload
keKit Modules
- Pick whichever ones you want loaded (Enable / Disable)
- Restart Blender or click "Reload Add-ons To Update" for all the keKit modules to reload properly.
keKit Settings
- Display Direct Select Mode
- Display the Direct Select Mode buttons keKit main panel, or not
- SnapCombos N-Panel Only
- Toggle the Snapping Combo buttons:
- OFF (Default): Display in the n-panel & the Blender Snapping Menu
- ON: Display only in n-panel - hiding it from the Snapping Menu
- Requires the Bookmarks & Presets module
- Cursor Menu
- Display the keKit Cursor Menu in the viewport header, or not
- Outliner Extra Buttons
- Standard Blender Operators as buttons in the Outliner header:
- Show Active
- Show One Level / Hide One Level
- VIDEO
- Sync Material & Viewport
- Toggle to show/hide button in Material Properties. See keKit Panel version here
- Sync Active BSDF material's color, roughness, metallic to Viewport Solid Shading Material
- Requires Render & Shade Module
- Color VIDEO - Texture VIDEO
- Experimental Mode
- Enable / disable experimental keKit features (that work, but may have quirks / issues)
- Menu items that require E.M. display "N/A" placeholder text if E.M. is OFF, or wont be displayed at all
- Currently only affects certain interactive property controls in Menus
- Known Issue: Error spam in console in some use cases - e.g. 'Menu Search'
- Note: They all work just fine besides this issue. Fix: TBD
- TT-Icons
- Viewport TT-Toggle Icons placement:
- Left, Center(left), Right or Remove (Do not display)
- Visibility for TT Toggle Mode icons in the viewport
- Requires Transform Tools Module
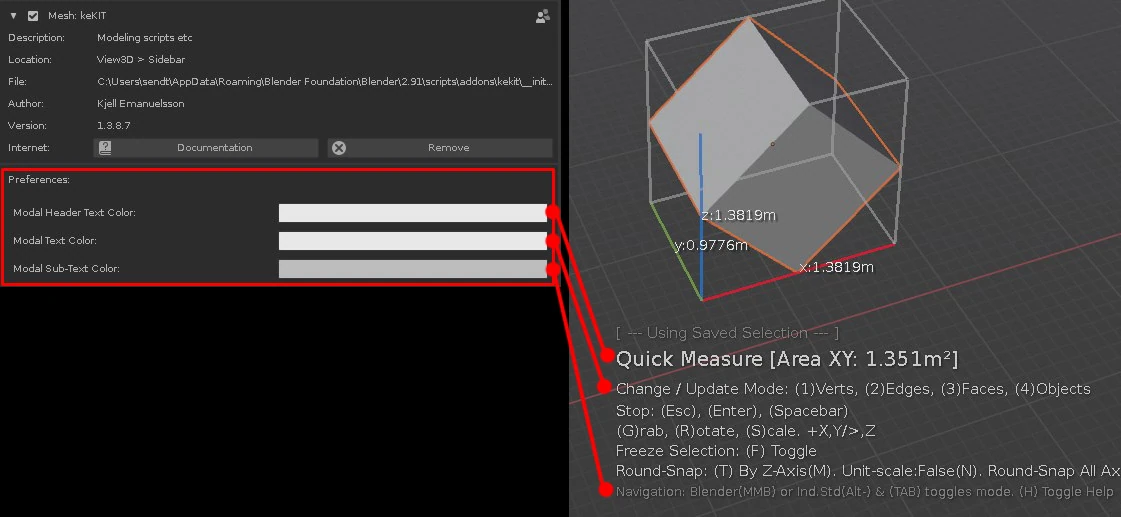
- Modal Text
- keKit modal operators on-screen text display adjustments
- Text Scale: Extra size control (in addition to the Blender UI scale setting)
- Colors: UI text colors. Example: IMAGE
keKit Shortcut Tools
This sub-menu in keKit Add-on prefs is dedicated to shortcut managment:- Collapse Shortcuts
- Collapses (All) shortcuts for better overview in listings
- Runs automatically when using Find Unset & Find Unset Dupes (see below)
- Also collapses all expanded shortcuts in the regular shortcut panel
- Note: Collapsed status may not be permanent (after restart) for some (3D View) shortcuts (Blender issue)
- List Assigned
- Shows the currently assigned shortcuts for keKit operators (& keKit pie menus)
- List Unassigned
- Shows the currently available un-assigned shortcuts for keKit operators
- Find Useless
- Checks for invalid shortcuts. Assigned to "missing" operators. (Any operators, not just keKit!) Likely to add up over the years; with operators being removed, changed names & always importing the user prefs.
- Probably safe to delete. You decide.
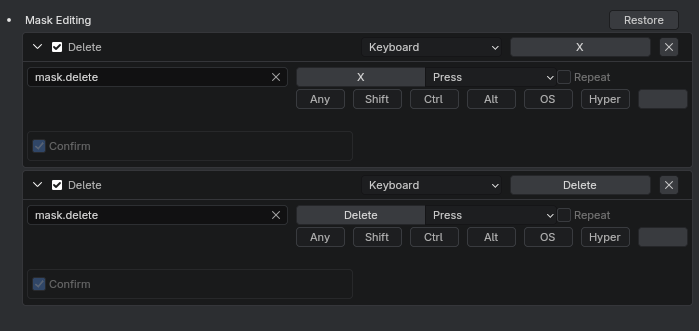
- Find Unset Duplicates
- Checks all shortcuts for duplicates of the same operator with default ("Unset") properties, in the same category.
- This is often intentional; There's many such default duplicates - for users choice: Image Example
- It is up to the user to identify when operators have been reset against the users wish
(as can happen when upgrading blender, accidentally disabling certain add-ons etc.). - Options: (Keep all enabled to reduce the amount of "false positives")
- Skip Tools: Skips '*Tools:' (e.g: "3D View Tool:*", "Node Tool:*") categories as they have a lot of intentional duplicates
User Only: Only list shortcuts made/changed by the user. Disabling this will list a lot of false positives
Active Only: Only list active shortcuts. (Disabled shortcuts are less of a problem) Toggle off for clean-up. Or something - Note: The shortcuts must be manually listed/refreshed by clicking the "Find Unset Duplicates" operator button.
The listing cannot be dynamically generated since *any* property change would make the shortcut no longer "unset" & immediately disappear from the listing. - Known Issues: There may be bpy.rna warnings spam in the console window that (AFAICT) can be safely ignored. A few props, mostly snapping related, cannot be checked for defaults. There's similar reports already in the Blender bug-tracker - fix TBD.
- Find Unset
- Same as Find Unset Duplicates above, but lists ALL unset ("default") shortcuts
- Most useful with the "User Only" option (as with Find Unset Duplicates)
- Direct Select Mode (Assign)
- Auto-setup keys 1,2,3 and 4 (as Vert,Edge,Face and Object) shortcuts for Direct Select Mode, and disable currently (conflicting) shortcuts.
Main Panel Header / Tab

All the keKit Modules will be appended to this header.
Custom Shortcut Setup Op
Found in add-on prefs (shortcut tools) : "Setup Direct Select Mode" will set 1234 shortcuts and disable conflicting ops automatically.
Panel Icons
Icon display can be disabled/enabled in keKit prefs settings
- Header Links:
- Add-on Prefs - Click the the keKit version nr in the header for quick access
- Update Check - Click the url-icon to open browser to see keKit updates
Direct Select Mode
Sets (vert, edge or face) Element Mode - directly, even from Object Mode. Similar to the vanilla Blender features, but with extra options.- Mouse-pick Mode
- Picks (selects) the object under the mouse pointer before switching mode
- Mouse-pick Extend
- Alternative mode - shortcut can be manually assigned in shortcut editor
- Non-mesh support
- Grease Pencil objects & Curves can also be toggled to/from Edit mode (Note: It's hard to mousepick curves without a geo bevel!)
- Mode-Toggle
- When this option is active, the each element can toggle "back" to Obj Mode (Element <-> Object)
Custom Shortcut Setup Op
Found in add-on prefs (shortcut tools) : "Setup Direct Select Mode" will set 1234 shortcuts and disable conflicting ops automatically.
Panel Icons
Icon display can be disabled/enabled in keKit prefs settings
keKit Cursor Menu
3D-Cursor Menu
Adds a custom 3D-Cursor Menu in the viewport header.- Tools to manipulate the 3D Cursor:
- Align To View
- Local Cursor Axis Step Rotation via preset steps or custom step value
- Align towards an object selected in menu
- Match rotation of the object
- Cursor Location & Rotation (same as regular cursor menu)
- Snap Cursor - To various items (as found in the pie menu)
- Cursor Bookmarks - Store and Recall Cursor Placement.
(Also found in bookmarks-panel and bookmarks pie-menu) - Menu-Icon placement/disabling in Add-on prefs
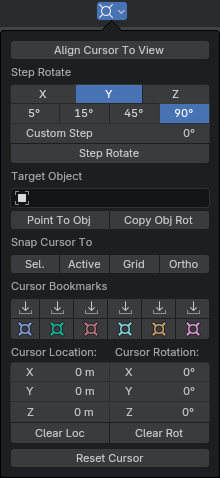
Cursor Ortho Snap
- Snap-Aligns the Cursor Z-axis to the nearest world (ortho) axis, relative to the viewport camera
- Found in the Cursor Menu (only): IMAGE
* * *
MODULES
Geometry Module
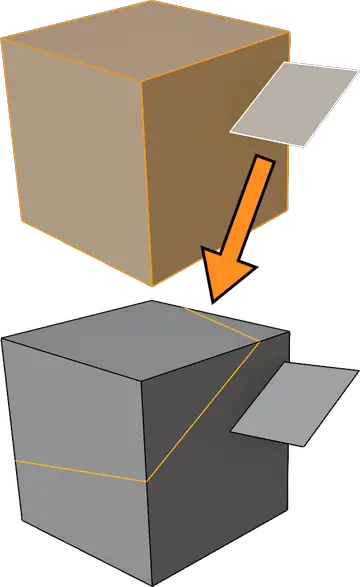
Creation, Duplication, Measurements, Object modesCut+, Copy+, Paste+
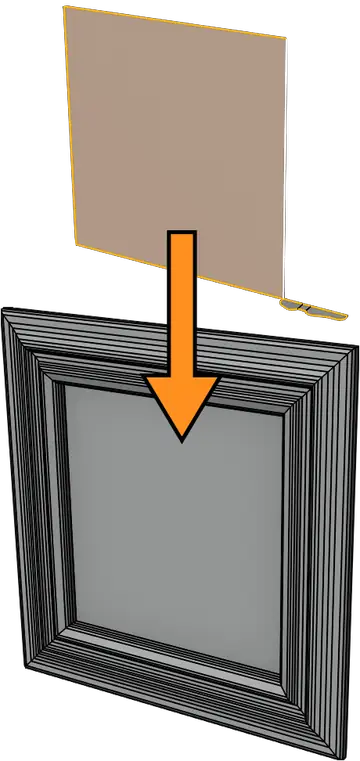
Cut+ or Copy+ stores selected elements/objects in a buffer (temp external blendfile) in Edit or Object Mode,which you can then Paste+ into another mesh in Edit Mode (merge), or into a new object in Object Mode.
VIDEO (YT)
The buffer is stored until a new Copy+ or Cut+ operation. (Paste+ unlimited nr of times.)
(Uses Blenders "Copy Objects" & "Paste Objects" copybuffer)
Option Buttons: (Object Mode)
- Paste+ Merge
- ON : Paste+ geo will be merged with selected object, or pasted as a new object if nothing is selected
- OFF : Not merged, selected or not
- Paste+ Mouse Point
- ON : Paste+ geo is placed at mouse pointer
- OFF : Original location
if disabled, the original material will be assigned - If enabled, duplicated: IMAGE
Note: Using Cut/Copy/Paste+ will provide a workaround for the Copy/Paste Objects dupe material issue
(also used by CutCopyPaste+) avoiding duplicate materials (unless you want that, then toggle as described above)
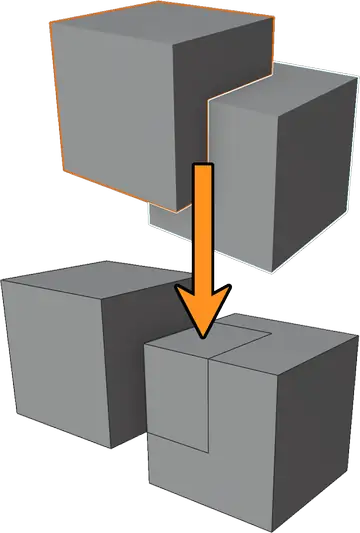
Extract & Edit
Instantly cut (extract) elements into a new Object & set Edit Mode. (Previously known as Itemize.)Options:
Customize E&E behaviour in Shortcut-settings: IMAGE
Tip: Create multiple shortcuts for different behaviours.
- Select Connected
- Automatically selects geo connected to your initial selection
- Duplicate
- Duplicates selection before extraction
- Origin
- "Copy" : Extracted obj uses same origin (loc/rot) as source obj (default)
- "Active" : Active Face or Edge(+2 connected edges) used for loc/rot origin placement
- "Apply" : Apply loc/rot (0,0,0) to extracted geo obj
- Mesh Data Copy
- Copy original object's mesh data: Normal settings & other attributes
- Object Properties Copy
- Copy original object's properties: Viewport visibility settings etc.
- Set Object Mode
- Does not enter Edit Mode in the new extracted Object
Extract & Extrude (ExEx)
- Extracts mesh selection, offsets and extrudes
- Offset & Extrude distances are automatically calculated by (shortest) edge length, unless overridden
- Options & adjustments in the redo-panel
- VIDEO
Mouse Mirror & Mouse Flip
Mirror or Flip selection based on mouse position (for direction) and Orientation type selected. (recalculated)- Global:
- Mirror using world origo
- Local:
- Edit Mode: 'BBox mode' global axis
- Object mode: 'BBox local mode', rotation w. Ind.Origins. Any other; not.
- Normal:
- Edit Mode - Only takes the Active Element into account for rotation/center and auto-selects connected mesh
- Cursor:
- Uses the cursor for center, and rotation if Pivot is also set to CURSOR, otherwise cursor rotation is ignored.
Extra: Local Duplicate - This enum option can only be manually assigned in the shortcut editor.
It will disregard current orientation & always use "local" mode, in both Object and Edit mode.
VP Flip
Unlisted: Operator only available in shortcut editor (add new shortcut, type 'vp' for autocomplete)- Link-Duplicate Object & rotate Object -180° & align to (near) original (No scaling involved)
- Duplication & data-linking can be toggled in redo menu
- Very convenient for placing level modules and such:
- VIDEO

Collision: BBox & Convex Hull
VIDEO (YT)- BBox:
- Generate mesh for the selection's Bounding Box
- Convex Hull:
- Generate a convex hull mesh for the selection
- Supports Instance Collections
- Reference Style Shading viewport shading option. (Wire & not render)
Instance Collection
A simpler way to create an Collection Instance object using the Active Object's Collection- with flexible center placement:
Center placement options (Redo Panel):
- Active Object
- Cursor
- Origo

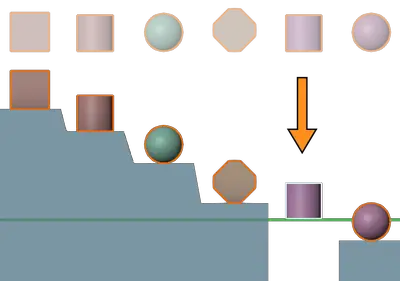
Quick Measure
Contextual Measurement Tool, by selection mode. Using Scene Unit.VIDEO (YT)
- Display Modes:
- VIDEO
- BBox - dimensions of selection - pictured -->
- Distance - Edge lengths or distance between 2+ verts, or objects
- BBox+Distance - Both at once, when applicable
- Additional Features:
- Area: Calculated from BBox. Toggle between planes (XY,XZ or YZ)
- Freeze Mode: Stores initial selection calculations, for geo tweaks: VIDEO (YT)
- QM FreezeMode: QM that starts in freeze mode.
- (Extra) Console Report: QM prints out the last result in the console when QM finishes.
- Object Mode BBox Calculation:
- Default is Accurate: Not using bounding box, but all verts (Potentially very slow)
- Fast Calc Mode can be toggled with (B):
- Uses object bbox for fast (& possibly incorrent) measurements. Useful for very heavy meshes, if they do not have wonky bounding boxes
Get & Set Edit Mode
Selects object under the mouse pointer and switches selection to Edit Mode.VIDEO (YT)
- Options:
- Extend - Extends the selection (multi-object editing)
- Element Mode Pick - Sets edit mode to the type of element under the mouse (vert/edge/face)
Zero Local
- Temporarily stores & zeroes an objects Location & Rotation & enter Local Mode
- Run Zero Local again to exit Local Mode & restore Location & Rotation
- Zero Local R: Rotation only
Local Mode by Distance
Include/Exclude objects in local mode from selection by distance. Options in redo-panel for:VIDEO
- Same Object Type Only (as selection)
- Invert Range
- Frame View on filtered selection
Unhide or Local Off
Unhide hidden objects, or set Local Mode off - if currently in Local mode. Compatible with Zero Local.Grid Scale Toggle
- Toggles between 4 Grid Scale Factor values for the 3D Viewport
- Values hardcoded (for now): 1.0, 0.5, 0.25 & 0.1
- Also in keOverlays Pie Menu
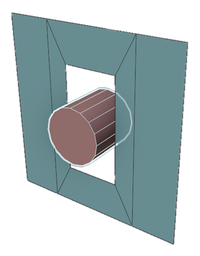
FitPrim
Creates (unit or unit+height) mesh primitive based on element selection - or the face under the mouse-pointer (in Object Mode).Define geo presets in the panel settings (and/or use the cylinder modal mode)
Assign shortcuts for fast operation or use FitPrim Pie Menu
- Vert Mode: Fits *along* 2 Selected verts
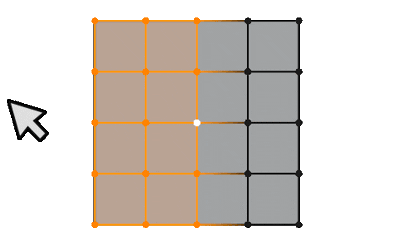
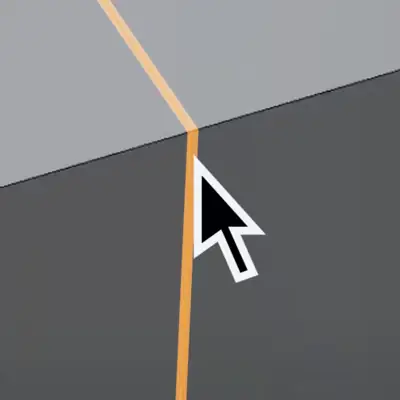
- Edge Mode: Fits *inbetween* selection(s) - pictured -->
- Face Mode: Fits *on* selection(s)
- YouTube VIDEO (Excerpt covering Edit Mode)
- YouTube VIDEO (Update video, Object Mode, Sphere)
- Features:
- Box, Cylinder, Plane, Sphere, QuadSphere & Empty Types:
- Box: The basic cube shape
- Cylinder: Use the modal mode for more features:
- Circle Mode: "C" key to collapse cylinder to a flat circle
- 'Plane' : 'P' (or 'W') to immediately switch & apply plane
- Numerical input : Type numbers to change side count
- Plane Primitive VIDEO
- QuadSphere uses Round Cube (Extra Objects Add-on) if available
- - Set QuadSphere Divisions preset (kekit panel) to 0 to NOT use preset
- - Fallback: Old divided cube method is used if Extra Objects is not active
- - Redo Options: VIDEO
- 'Empty' type works just like the other geo types for loc, rot & scl
- Void Size Clone Mouse over nothing with object(s) selected:
- - Uses bounding box (total) for the new unit primitive's size
- - Nothing selected: FitPrim default size as before:
VIDEO Tip: You can void-clone non-mesh objects too! - Default Shading: Set preferred shading option: FLAT, SMOOTH or AUTOSMOOTH (Smooth by Angle in 4.2) (in n-panel)

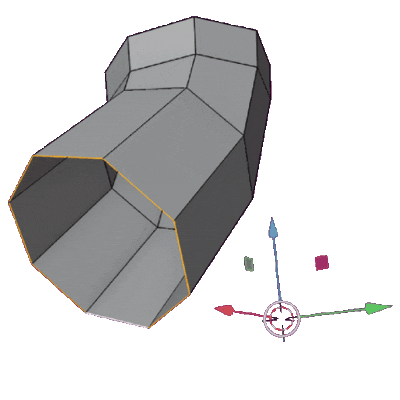
Unrotator
Overview VIDEO (YT)- Unrotates
- If the mouse pointer is over the selected elements:
- Unrotates geo using the active element as new 'bottom' (for inverted z rotation) - pictured -->
- Places
- Selection (connected to an active element) to the face normal under the mouse pointer
- If different geo than selected - with active element as new bottom (rotation & location)
- Grid Placement
- When pointing mouse over nothing:VIDEO
- Object Mode:
- Resets rotation or places on mouse over
- Uses modal to temporarily use object face snap in object mode
- Additional Features/Options:
- Duplication / Linked Duplication
- Auto-select Linked Mesh Elements
- Invert Rotation
- Center on Face Placement
- Group Move Feature: Using temp-parenting to place multi-object selections. VIDEO
- Multi Object Clear Rotation support: All selected objects are rotation-cleared, when pointing at a selected object
- "Randomize Z rotation duplicate" option: VIDEO
- Note:
- LMB to place, RMB to cancel. SHIFT-LMB to center on face-snap.
- (to the center of the face under the mouse pointer)
- Previous snapping settings will be restored after the modal
- Modal Shortcuts info in the status bar (as seen in the video above)
Render & Shade Module
Render Visible
Render Image of only what is currently visible in the viewport - Regardless of outliner object render toggles.- Option:
- Toggle for using Slot Cycling
- Temporarily sets render-toggles & uses a modal-timer hack to enable visible render progress
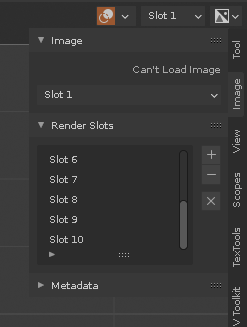
Render Image Slot Cycle
Render Image to the first empty render slot (supports any nr of slots*)- Wrap toggle on:
- Cycle overwrites existing slots, looping back to slot 1 after the last slot
- Wrap toggle off:
- No overwrites, you will be notified when all slots are full
- Tip:
- You can add extra slots in the render window
- Save your startup scene to use extra slots by default (Set Slot 1 as active!)
BG Sync
- Sync the Viewport Preview shading EXR to world render (incl. built in EXR's) with rotation and strength values
- It will file/node-manage for you, and reuse when possible: IMAGE
- It is also available in the keKit Shading Pie Menu
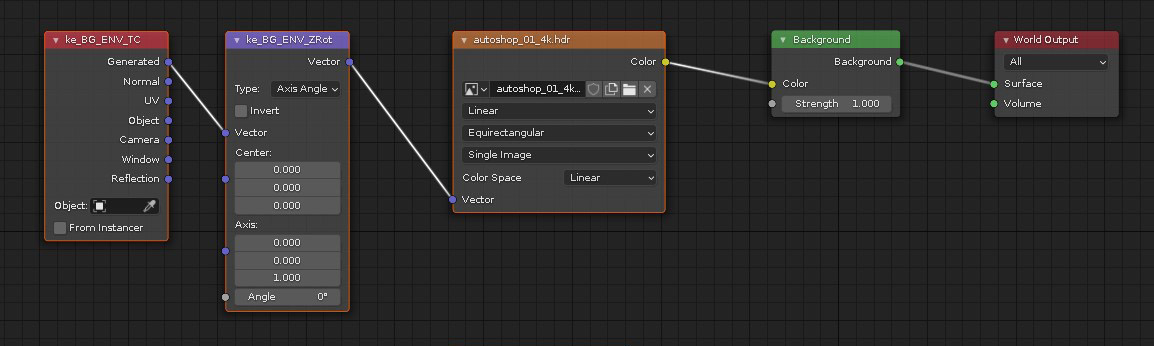
Sync Material & Viewport
- Copy the material color, roughness & metallic to Viewport display, to use in Solid Material Shading
- VIDEO
- It will also (attempt to) calculate an average color if an sRGB image is used for Color
- VIDEO
- Also availabe in the Material properties panel (if the option is enabled in keKit prefs)
- The Render panel button will process ALL the objects materials
- The Material properties button will only process the currently active material
Get & Set Material
Grabs material from any object's face under the mouse pointer and applies it to the current selectionVIDEO (YT)
Can also grab a texture from a drag & drop image empty & assign it to a new material for your selection:
(It will check if a material is already using the texture to re-use that instead of making a new material every time)
VIDEO
Option: Remove Unused - Uncheck to keep all material slots, even if they are not used.
Unwrap Macro
- A macro script to do common (to me) UV-unwrapping tasks - in one click.
- For use in the 3D Viewport.
- Object Mode: Process entire mesh
- Edit Mode: Process selected faces
- Requirements:
- TexTools add-on (& ideally some experience using it)
- Material with a texture
- The script servees two different goals:
- A. Unwrap for reference texture mapping (for block-out models - not for baking)
- B. Quick & dirty packing (for baking). Note: If you want 100% optimal UV's, this may just be 'a starting point'
- Redo Panel options to accomodate these methods/goals:
- Auto-Seam: (via Select Sharp Angles). If not, user-assigned seams may be needed
- Auto-Pack: Regular UV Pack with margin tweak only. Note: Texel density will be ignored
- Canvas Align (Stack): Place each UV island on specified canvas location. Default is 0,0 (bottom left)
- Use Same UDIM
- ON : All selected objects will be packed together in the same UDIM space
- OFF: Each packed separately (0-1)
- Note: Only available in Object mode - Edit Mode is always ON ( muti-edit mode)
- Option: Object Mode Auto-seam
- Always ON in Object Mode and always OFF in edit mode.
- Added TexTools Texel Density override in redo panel
- Fix: Packing with 'Allow Rotation' will now actually allow rotation
- Always applied:
- Align World: (TexTools Align World) Align UV islands to their world orientation
- Texel Density: Scales UV Islands to match density specified in TexTools
- VIDEO DEMO
- Result examples: IMAGE
Toggle Attributes
- Toggle Bevel Weight
- Inverts selected elements weighting (1 to 0 or 0 to 1). Rounds to 0 or 1 first: 0.6 -> 1 -> 0
- Intended for shortcut use
- Also works in face mode (converts to edges)
- Options:
- All - Invert & Toggle all selected elements to 0 or 1 (by majority). Off: Toggles each individual element
- Mod - Automatically add Bevel (Weight) modifier + Weighted Normal modifier if not present. (Button in Modifiers panel)
- Redo Panel Edge Group Selection - picking which group will be affected by TBW (in B4.3+)
- Use operator with no elements selected to change group without affecting edges:
- QUICK DEMO VIDEO
- Toggle Crease Weight
- Inverts selected elements weighting (1 to 0 or 0 to 1). Rounds to 0 or 1 first: 0.6 -> 1 -> 0
- Intended for shortcut use
- Also works in face mode (converts to edges)
- Options:
- All - Invert & Toggle all selected elements to 0 or 1 (by majority). Off: Toggles each individual element
- Mod - Automatically add Subdivision modifier (using SubD Toggle) if not present. (Button in Modifiers panel)
- Toggle Seam
- Inverts selected edges Seam status (1 to 0 or 0 to 1)
- Intended for shortcut use
- Also works in face or vertex mode (as long as the selection converts to edges)
- Option: Toggles all selected elements to 0 or 1 based on which is most common (AFTER inverting). Off: Toggles each individual element
- Toggle Sharp
- Same as Toggle Seam, but for sharpness.
- Toggles regular sharp/mooth shading in face mode & sharp edge attribute in edge mode

ID Materials
Applies simple "ID" Material to Object(s) / Faces.A common masking/baking utility. Baking use-case example: IMAGE
Also available in the ID Materials pie menu
- Auto-Viewport Transparency:
- Sets the Alpha Blend (& no shadows) viewport shading setting:
- When you set alpha below 1.0
- Useful for non-baking use cases (retopo, collision mesh etc.)
Cycles Texture Reload
- Reload all the active materials' images and restart cycles (or EEVEE)
- Not listed in keKit panel - Intended for shortcut use
Bookmarks & Presets Module

View Bookmarks
Stores the current view camera's transform in bookmark slots.YouTube Video Demo
- Adding new items: Enter name into Name Text Field & hit Enter.
Or, leave blank and press "+" for auto-naming. - Stored bookmarks will be automatically listed. Click button to recall stored view.
- Slots are unlimited (though Blender's UI might start choking around a thousand or so)
- Slots are stored per scene.
- Cycle View Bookmarks
- This button does what it says it does.
- Get & Set View
- Get: Grabs current View transform (to Text Field)
- Text Field : Copy/Paste View data. Add to that bug-report. Message your coworker. etc.
- Set: Applies View transform (from Text Field)
Snapping Combos
- Bookmarks the current snapping settings in one of 6 slots
- Hotkey the stored slots (1-6), or use the snapping pie menu
- The combo buttons are located in the regular Blender snapping menu, if the prefs-option to hide them is not enabled. Otherwise just the panel.
- The combos can be renamed (for the pie menu) in the panel
- The combos are persistantly stored in Add-on prefs.
- Tip: It is recommended to set the Slots in Edit Mode

Orientation & Pivot Combos
Set up 6 combo-operators that will set Orientation & Pivot to your most commonly used combinations.- ▢ O&P Operator (Assign Hotkey and/or use in pie menu)
- ▢ Set Orientation & Pivot for OPC1 Object Mode
- ▢ Set Orientation & Pivot for OPC1 Edit Mode
- The combos are persistantly stored in Add-on prefs.
Modifier Presets
Stores the selected Object's modifiers as a preset: YouTube DemoUse-case Video Demo (via 3rd party)
- Stores every single property, almost, including visibility, pinning etc.
- Apply the preset to any (compatible) object(s)
- Persistant storage - stored in a JSON file (in your CONFIG path)
- Unlimited* slots
- Add new preset by pressing 'Enter' after entering new preset name in the text field (no need to press "+")
(Consequentially, the "+" button is now only useful for 'auto-naming' entries) - Curve Support: Also stores curve settings (bevel and segments etc.) along with any modifiers - entries of curve presets will be marked with a curve icon.
- Custom Geo Nodes Support: You should import GN's from a user Asset Library.
Tip: use the "Smooth by Angle" asset blendfile as a template example.
Note: The asset .blend file needs to have the exact same name as the GN nodegroup (= Modfier Presets id) - Also available in Modifier Presets Pie menu (actually a context-menu, same category) (& SubD pie menu!)
- Option: Add or Replace Checked/ON will ADD the preset modifers when LOADING, instead of REPLACING them. Note that 'Pin to Last' settings will NOT be loaded when using Add-mode, keeping any pinned modifiers unchanged.
- Limitations:
- - Physics modifiers are not handled. Probably best as a separate op; TBD.
- - Scene-specific properties, like Objects, are not handled.
- - Profiles for regular modifiers will only set presets (& will not work at all for curves)
* Not literally unlimited, but the UI will probably become unusable after a few hundred/thousand or so.
well before the technical limit is reached
Select & Align Module
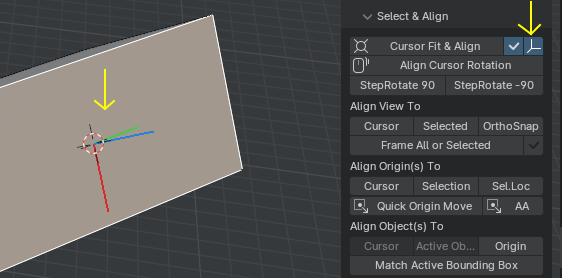
Cursor Fit & Align
Release VIDEO (YT)Also availabe in pie menu
- Edit Mode:
- Snaps 3D Cursor to selected elements (average position) and calculates 3D Cursor rotation from FACE/VERT/EDGE selection
- No selection: Cursor reset
- Object Mode:
- No selection (+ mouse over nothing): Cursor reset
- Face Align: Pointing at any mesh object will align the cursor to the face under the mouse, regardless of obj selection.
- Object Align: 1 Object selected and pointing mouse over NOTHING will align cursor to the selected objects location & rotation.
- Align Between: 2+ Objects selected and pointing mouse over NOTHING will align the cursor between the objects. (Uses Z-axis to point towards the 2nd object)
- Group Align: 3+ Objects selected uses active object for rotation, with averaged location.
- Options:
- O&P Toggle - Also sets Orientation & Pivot to Cursor mode(s)
- Cursor Rotation Axis Gizmo:
- A simple *temporary* axis indicator: IMAGE
- Only displays until *ANY* input (except mousewheel)up to 10s max
Align Cursor Rotation
Aligns the 3D Cursor rotation to the face under the mouse pointer, or clears rotation if over nothing.VIDEO
Step Rotate
- Rotates selected Object(s) depending on viewplane facing the camera: VIDEO
- Intended for shortcut assignment (Panel buttons just for shortcut assistance)
- Rounds to sensible rotation values. >359° is redundant, except for animation perhaps - just use regular rotate in those cases!
- Also works in the UV-Editor for selected UVs
- Note: Adjust step-values manually in prefs: IMAGE
- Also availabe in the Step Rotate Pie Menu
Align View
- Align the viewport to:
- Selected: (Active) Orthographic Toggle. Run again to restore view.("Align View To Active" SHIFT-NUM7 replacement)
- Cursor: Orthographic Toggle. Run again to restore view. (Cursor Fit & Align recommended for correct/useful rotation)
Ortho Snap
Snap perspective view to nearest orthographic view.Similar to 'Axis Snap' modal for 'Rotate View' - but as a discrete click. A complementary feature.
No toggle - just rotate view back to perspective.
Frame All or Selected
Frame selection in View, or everything if nothing is selected.- Geo Only Toggle:
- Ignores non-geo objects (Lights, Cameras etc) for 'Frame All' (nothing selected)
Align Origin(s)
- Align selected objects' origin Location/Rotation to:
- Cursor (Edit & Object Mode)
- Selection: Selected element normal (Edit Mode) with inverted z-axis (toggle)
- Sel.Loc: Selection Location average (Edit & Object Mode)
Quick Origin Move
Run Grab Tool for selected objects Origin (in modal) to skip having to set "Affect origin only" on and off.- Auto Axis Variant:
- Will use Mouse Axis instead of default Grab Tool
Align Object(s)
- Align selected Object(s) Location/Rotation to:
- Cursor (Cursor Fit & Align recommended)
- Active Object (Location, Rotation, Scale)
- Origin (Selected to Origin) - as "Geometry to Origin" but also works in Edit Mode for element selection
- Will work with multiple selected objects (In Edit Mode too); Each object will use its own origin
- Find In keSnapAlign pie-menu or Select & Align keKit panel
Origin to Geo, Origin to Cursor, Origin to Center Mass (Surface & Volume)
(old) VIDEO (YT)
Match Active Bounding Box
- Scales selected object(s) to last selected object's bounding box (along axis - set in redo-panel)
- Place & Rotate origin(s) beforehand for scaling operation to behave as expected - if needed.
- Scale will be auto-applied (Note: Does not check for negative scale, flipping normals.)
Straighten
- Snap an objects rotation to the nearest 90 degree angles
- Set custom degree override in the redo panel
- Also available in the Step Rotate Pie Menu
Swap Places
Swap places (transforms) for two objects. loc, rot & scale. (Apply scale first if you dont want to swap scales.)Lock, Lock Unselected & Unlock
- Easy acces to assign shortcut(s) for locking (Same as "Disable Selection" in the Outliner)
- Unlock (Selection Enable) applies to all locked objects
EmptyParent
Parent objects to automatically created Empty - for simple grouping purposes.Customize preferred defaults in shortcut.
Options in the redo panel:
- Parent the selected objects, or the collection the active object belongs to
- Empty created at Active Object Origin, Cursor or Origo
- Empty can optionally inherit rotation from Active Obj or Cursor
- Empty display size and type can be set
- Parenting using default, Keep Transform, No Inverse or Keep + No Inverse modes
Select Boundary+
Select Boundary ('region_to_loop') that also sets one edge to Active. (Handy for scripts that need an Active edge.)VIDEO
- Inner Region Toggle:
- When you have a boundary selected, you can run again to toggle between region & boundary
Select Inverted Linked
Edit Mode: Inverts element selection - but only on connected / linked mesh geo.Object mode: Regular Invert-select
Mouse Side of Active
Like vanilla Side of Active, but using mouse position to automatically calculate which side of the active element to select.VIDEO
Mouse Select Mirror
Like Mouse Side of Active above; the position of the mouse relative to selection picks axis,but using Blender's Select Mirror (with the same limitations - your origin placement will be important)
Show in Outliner
- Locate the selected object(s) in the outliner
- Appended to Object Context Menu (intended use location)
Set Active Collection
- Set selected object's parent collection as Active
- Appended to Object Context Menu (intended use location)
Select Objects by Vert Selection
In Multi-Object Edit Mode: Selects only objects that have vertices selected, and set object modeSelect by Display Type
Select visible objects in scene by viewport display type: Textured, Solid, Wire, Bounds (With subtypes)- Option:
- "Active Collection Only" toggle
Modeling Module
Extrude Along Edges
Extrude from shape edge loop(s) along a path edge loop (that has the Active Element)- Supports face selection (automatically converts to edge selection)
- Similar to CBO (below) but directly in Edit Mode. (Simple and easy to use. And destructive, for direct modeling)
- (Also availabe in the keMisc Pie Menu)
YouTube DEMO VIDEO
Convert to CBO
Convert a "shape" edge loop to 'Curve Bevel Object' curve & a "path" edge loop to host curve.Similar to 'Extrude Along Edges' above, but with curve objects. A bit more complicated, but non-destructive.
Note: 'Convert to CBO' is just a setup script. Please read the Blender docs on curves & how CBO's work in particular.
YT VIDEO
- Edit Mode Selection Conversion:
- The "path" edge loop must contain the Active Element
- CBO must be flat on z-axis, with the "front" along the x-axis, regardless of path curve orientation
- The origin point of the CBO will be placed at the vert on the path loop end, closest to the CBO
- The redo panel has options to flip curve directions (inverting mesh)
- Object Mode:
- If you already have 2 curves, 'Convert to CBO' can be used to set-up the CBO:
- The Active Object will be the "path" curve and the 2nd curve will be the CBO.
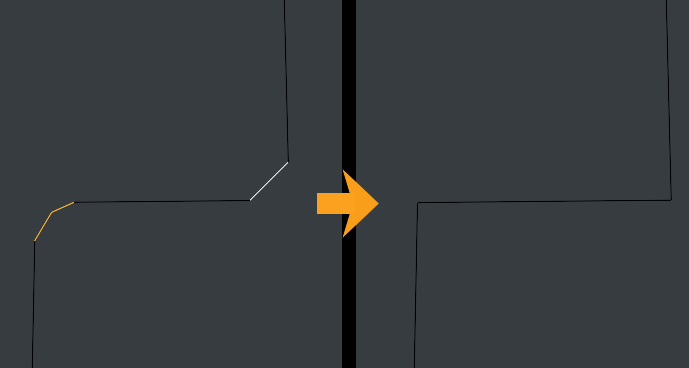
Unbevel
Remove (or "re-bevel") beveled corners on meshes: VIDEO- Edges: Select the the ring-edges of the bevel you wish to "unbevel"
- Faces: Select a row (technically a "column") of bevel faces (gif ->)
- Adjust settings/options in redo-panel.
Auto-ring - Runs edge-ring selection before unbevel.
Note: Also supports polyline (loose edges) unbevel
Face mode will either unbevel the whole ring with auto-ring enabled, or, just one column. For more precise control, use edge mode.
Rebevel Options:
Keep Width - Keeps the size of the bevel (uncheck for custom offset value)
Count - New segment count
Profile - as regular bevel profile
Merge UVs - As regular bevel option
Ground or Center
Ground: Drop selection to Z-Axis location Zero (or custom override value) or,Center Selected (elements or objects).
Select Process & Operation in redo panel
- Process:
- Individual: Process each selected object/vertex separately
- Group Averaged: Average center of selection as group center
- Group Active: Active object/element in selection as group center
- Loose Parts: (Previously called "Connected") VIDEO
- Edit Mode: Edge-connected selection 'islands' as separate groups, E.g. Edge-rings on a pipe/cylinder
- Object Mode: Each object(s) parts (connected geo 'islands') as separate groups
- Note: Loose Parts (& Mesh Object Modes) use a bound box calculation: VIDEO
- Operation:
- Ground: Drops selection so that the bottom is on Z0
- Ground Midpoint: Drops selection so that its midpoint is Z0
- Ground & Center XY: Drops Z to ground and zeros X & Y
- Center XYZ: Drops Z to midpoint and zeros X & Y
- Under-Ground: Drops selection -below- ground
- Options:
- Raycast: Stops on obstructions (or Ground if nothing is hit)
- Ignore Selected: (Object Mode) Ignore selection when raycasting

Nice Project
Knife Project, but nice (to use). VIDEO (YT)Edit mode: Element selection is the cutter. All other visible faces will be cut.
Object mode: Active Object is the cutter. All other visible Objects will be cut.
Options:
Use All Edges option (Edit & Object Mode), treats all edges as boundary edges to use for cutting: VIDEO
Note: Object Mode cutters with no boundary edges will automatically switch to "Use All Edges" mode, as seen in the video above.
Cut-through (same as regular Knife Project)
Edit Mode Only:
Keep Cutter Geo (or delete it post op)
Keep Cutter Selected (or select resulting geo)
Tip: As Nice Project uses the regular Knife Project, it also works with Curves as Cutters (in Object Mode).
Note: Redo will use the current view = If you redo after you have changed the view since the last execution, the current view is the view that will be used.
Bool Knife
Same as Blender's (Edit Mesh/Face menu/) Intersect (Knife), but,with Object Mode support, and, 'Cutter' mesh is unaffected in Edit Mode
(does not slice itself).
VIDEO
Active Slice
Slice selected elements - with method per element selection mode:- VERTEX: Global Axis cut using Active Vert + View (nearest Global Axis)
- EDGE: Active Edge direction + (perpendicular) linked face orientation
- FACE: Active Face as cutting plane (pictured)
- Options for each mode are in the redo-panel
- Active Slice is also available in the keMisc Pie Menu (in Edit Mode)
Delete Outer / Inner geo option: VIDEO
Grid Slice
A simple modal slice/bisect tool that snaps to the grid, by default,as a complementary tool to the Knife tool (not a replacement).
- Place 2 markers to define slice angle, relative to the view
- The second click/marker will also Apply the operation.
- Optionally, hold down CTRL to NOT use grid snapping
- Option: Auto-apply scale. Note: A general keKit setting, shared by a few ops.
- ESC or RMB to cancel. (Info is also listed in the status bar)

Quads
Tris To Quads but with N-gon support (triangulated before quad conversion)Wonkify
Randomizes objects/components to 'reduce artificiality'- Object Mode: Applies minor random transform per VERT, PART or OBJECT - adding a SHAPE KEY
- Edit Mode: Uses Edges/Faces SELECTION Island(s) similar to 'Part' operation
- Non-Mesh Objects: will not use Shape Keys, but regular Transform OR Delta Transform
- Mesh VIDEO DEMO
- Non-Mesh VIDEO DEMO
- Use-case Example YouTube Video (Principle, not script demo. 3rd party.)

Merge To Mouse
- Vert & Face Mode: Merge selected vertices to the selected (or edgelinked) vert closest to the Mouse Pointer
- Edge Mode: Collapse selected edges to edge(s) closest to the Mouse Pointer, OR,
- merge to verts IF selection is not collapsable rows (single loop edges (connected),single edge, etc.)
- Toggle Option: 'C' - On: Edge Row Collapse, Off: All modes are the same as vertex mode
- VIDEO (YT)
Merge Near Selected
- Merges other verts near selected verts to them (in any element mode!) at set link-depth and distance
- Option (Redo Panel): Remove Collinear Verts
- Useful for boolean clean-up & general mesh simplification
- VIDEO
MergeCollapse
Perform Merge / Collapse actions depending on Edit Mode Element Selection Mode:- VERT MODE: Merge selected verts to the Active vert (as 'Merge To Last')
- Tip: With no Active Vert is in selection Collapse Average is used
- (when converting a selection, from faces to verts, for example)
- EDGE MODE: Merge selected edges to the Active Edge OR Collapse (toggle preference in panel)
- VIDEO
- FACE MODE: Collapse (Average)
Fit 2 Grid
- Snap each vert in selection to nearest grid position
- Define grid spacing to use in redo-panel
- Fit2Grid pie menu(s) are available with preset grid sizes
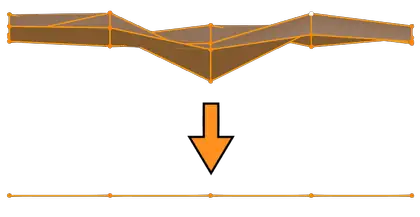
ZeroScale
Scales selected elements to "zero" / flattens, in various methods:- ZeroScale Modes:
- V / H: Zero-scale/Flatten selected elements to axis nearest
screen vertical or horizontal - Normal: Using Active Element as basis for scaling
- Cursor: Using the Cursor location & z-rotation
- Using Cursor Fit & Align (or similar) is recommended.
- Step-by-step: IMAGE
- Also available in the Snap-Align pie menu (except ZS-Auto)
- VIDEO (YT)
- Zero-scale/Flatten selection to nearest Vertical or Horizontal global axis
- Based on Mouse position relative to Active Element (Vert,Edge or Face)
- Note: An Active Edge will use "end vert" (if first or last in loop) as active position. Else, average/center pos.
- VIDEO DEMO
- ZeroScale (Auto) also works in the UV Editor:
The UV-vert nearest the mouse is used as a "fake active vert"
(as there is no "active" vert in the UV-editor)
Note: Shortcut needs to be added manually for the uv-editor
Simple VIDEO demo
Scale from Face
Match scale of objects by selected reference faces - matching the active face on the active object- Select 1 Face per Object in Multi-Object Edit mode:
- Scales all the selected object(s) by the size(area) difference factor of selected faces to the active face
- VIDEO
- Scale will be auto-applied (Note: Does not check for negative scale, flipping the normals)
Quick Scale
- Scales Object(s) or element selection to desired size (in current scene unit)
- Unit size ('U') keeps proportions intact
- Obj & Edit mode (selection)
- Object Mode operates in Local Space, and Edit Mode selections in World Space
- Example: An object/selection needs to be exactly 1.835m on Z, while keeping the other axis proportions intact:
- Enter 1.835 as the QScale value and hit the Z button with the 'U' unit size option on

MultiCut
Double-cut edge rings with optional middle cut. (Like Loop Cut combined with Offset Edge Slide for the ends)VIDEO
User customizable presets to use in the panel, as hotkeys, or in the MultiCut Pie Menu
The Presets will be named automatically based on the values (--> )
or, use the "Manual Rename" button to name manually.
You can use relative (%) or fixed offset (in real measurements, like cm etc.) The one value will be used on both ends of the edge.
Note: Saving presets with fixed offset value NOT zero will be saved as a fixed offset preset. And vice versa.
Direct Loop Cut
Insert an edge loop on an edge at the mouse pointer. No selection needed (option).VIDEO (YT)
Slide: Uses built-in Edge Slide afterwards
Center Cuts: With edge(s) selected & with the mouse over nothing, or another object, a center-cut will be performed
Multi-Cuts: Center Cuts, as above, on all selected edges' edge rings.
Limit Faces: Selected faces (on the edge ring) will limit the cut to those faces. Point the mouse over intended starting edge (or near it in space for mid-cut). Note: This works on "checker-selected" faces too.
It also works on Loose Edges (select and point, or multi-cut as above)
Option: Selection-Only or Mouse Pick Toggle.
Direct Insert Vertex
Variant of Direct Loop Cut that just inserts a single vertex.Slide: Uses built-in Vertex Slide afterwards
Option: Selection-Only (or Mouse Pick) Toggle. (Shared with Direct Loop Cut)
Modifiers Module

Linear Array / Instances
Creates an array in a line spaced automatically between the original object and where you point the mouse:VIDEO (YT)
Note: The local orientation the Object will be used.
- Modal:
- Modal shortcuts are listed in the status bar
- Note: Numerical input is now always available for LA: No input mode is required.
- Adjustment Mode:
- Run LA again on existing LA array to re-enter modal
- Note: Adjustment Mode is not availabe when finalized to instances:
- Linear Instances:
- 'Linear Instances' is a preset variant of Linear Array that instantly finalizes to linked duplicates when you apply the modal
- Also available as a shortcut during the the Linear Array modal: ("F")
- Adjustment Mode is no longer availabe when finalized to instances

Radial Array
A modal tool for setting up a (legacy) circular Array Modifier solution.The cursor defines the circle center location and rotation
(Cursor Z-axis = "Hub" axis)
(Old) VIDEO (YT)
- Adjustment Mode:
- Run RA again on existing RA array to re-enter modal
- Option:
- Automatic arrange (as the video), or not.
- Auto-Arrange is on by default
- The Auto-Arrange option can be toggled in the shortcut editor
- Modal:
- Modal shortcuts are listed in the status bar

Radial Instances
A modal tool for circular duplication of linked mesh data objects (aka Instances) :VIDEO (YT)
- RI does not use Geometry Nodes or Blender Array Modifiers
- Unlike Linear Array & Instances, RI is a separate operator from Radial Array
- Adjustment Mode:
- A pseudo-non-destructive re-activation feature:
- Run RI again on an existing RI setup (select Emtpy or Object)
to re-enter modal. - Use:
- Place the Cursor as center point (location)
- The center point 'Hub' axis (rotation):
- Rotation: Uses the selected Object's (closest) axis facing you/view
Solo Cutter & Solo PreCutter
VIDEO (YT)- Cutter:
- Refers to an object used in (any) boolean operation by a boolean modifier (regardless of operation type)
- Solo:
- Hides all other modifiers except the boolean modifier used by the selected "cutter"
- PreCutter variant
- Only hides other modifiers after the boolean in the modifier stack.
Show Cutter Modifier
VIDEO- Set objects as active that use the selected 'cutter object' in a boolean modifier.
- Open, unfold and set modifier as active in properties panel for quick access.
- Run again to cycle through objects, if cutter is used in many different objects.
- Also available in keKit SubD Pie Menu
Toggle Modifier Visibility
- Toggles ALL (Active object or Selected Objects) modifiers viewport visibility
- Tip: If ANY modifier is OFF - all will be set to OFF. Run again to invert
Flat/Smooth Shading Toggle
- Toggle for selected object(s) in Object or Edit mode
- Triangulate Modifier Toggle Option: Can be used for more accurate shading
Toggle Attributes
See the Render & Shade module entryNote: The Modifier options are only listed in the Modifiers module panel
Bevel Tweaker
Adjust Bevel Modifiers in a modal similar to the regular Bevel operator.QUICK DEMO VIDEO
- Object Mode: Mouse over edge used by a Bevel Modifier you want to tweak
- Edit Mode: Select (at least 1) edge (or vertex) to tweak
- Object Mode also supports tweaking Curve Bevels and Text:
- QUICK DEMO VIDEO
- BT was originally written for Edge Attribute Bevels (mostly) and is only for B4.3+
- Overall modal mouse sensitivity can be adjusted in keKit add-on prefs
- You can adjust both regular sensitivity and precision mode separately.
Tip: Regular sensitivity is contextual (depends on the size of the bevel when starting adjustment)
- but the precision mode is NOT - you can use precision mode to always have the same "scale".
- Mouse movement will change Bevel size (like the regular Bevel operator)
- SHIFT+Mouse movement to use Precision Mode
- Mouse Wheel to change Bevel Segments
- Numerical keys [1-9] - Switch between the Bevel Modifiers found on the object (listed on screen) to set Active Bevel
- SHIFT+[1-9] to switch and KEEP changes: Otherwise "undo" changes made to previous mod.
- [A,W,Q,E,O] keys toggle alternative (mouse movement) adjustment modes and states:
(A)ngle adjust, (W)ireframe display, (Q)Clamp Overlap, Curve (E)xtrude & Curve (O)ffset (if Curve/Text Object) - [Z,X,C] will set Profile Shape to 0.5, 0.7 & 1.0, respectively.

SubD Tools
- Step Viewport Level +/-
- Increase or decrease viewport SubD level on selected Object(s) one step
- Set VP Level
- Set viewport subD level on selected Object(s) as specified in SubD Toggle Options. Note: Changing the value will also change the preset for Subd Toggle
- Set Render Level
- Set render subD level on selected Object(s) as specified in SubD Toggle Options. Note: Changing the value will also change the preset for Subd Toggle
- SubD Toggle
- Toggle (modifier visibility) or Assign subD modifier if none exists.
- Customize SubD Toggle from a wide range of options to create a preset subdivision modifier to your liking
Modifier Focus
Note: Unlisted in keKit panel - Used in ke Pie Menus keBevel & keSubdClicking on Icon/Title of listed Mod (in pie menu context) will open Properties/Modifier tab and collapse display of all modifiers, except the "focused" one that's expanded and set to Active: QUICK DEMO VIDEO
Context Tools Module
Context Bevel
Launches appropriate bevel tool based on what element selection mode you are in:- VERTEX: Vertex bevel Tool
- EDGE: Edge bevel
- FACE: Inset (Tip: Ctrl-drag to extrude --> effectively "Extrude Region Faces Along Normal" Tool)
- Korean / Flat Bevels Toggle: Global toggle for 'Korean' (aka 'Flat Bevels') or regular. Also available in the SubD Pie Menu
Context Extrude
Launches appropriate extrude tool by selection mode:- VERTEX: Vertex Extrude
- EDGE: Edge Extrude
- FACE: Face Extrude Region Normal
- TT Toggle - support for transform tool mode
Context Delete
Deletes elements by selection mode: VERTEX, EDGE or FACE - or Objects, in Object Mode.- Options:
- Smart Dissolve: Dissolves Verts & Edges, Deletes faces & loose geometry: VIDEO
- Hierarchy Delete: (Object Mode) Deletes child-objects too
- Use Cut+ Buffer: Deleted object(s) (or faces in Edit Mode) are stored in the Copy+ buffer (so that they can be used by Paste+) This essentially combines Cut+ and Context Delete
Context Dissolve
Dissolves elements by selection mode: VERTEX, EDGE or FACEContext Select / Extend / Subtract
Performs different selection by selection mode:- VERTEX: Select Boundary Edges on mesh, Linked Select if no borders OR Linked Select only (Option toggle)
- EDGE: Loop select
- FACE: Linked select
- Options:
- Collection Select: Selects all objects in the coll. that the selected object is in
- Vertex Mode Toggle: Boundary edges select OR linked select only
- Full hierarchy: Object Mode selection will select all the children too
Shortcut Mapping Example
Context Select Sharp Edges
OBJECT MODE: Sets Edge Mode and selects ALL sharp edgesEDIT MODE: Limit sharp selection to selected faces/edges
No selection = Selects ALL sharp edges
Quick VIDEO demo
Bridge or Fill
VIDEO (YT)- Grid Fill: When one continous boundary edge-loop (aka "hole") is selected
- Bridge: Between selected (non-continous) edges
- F2 mode: 1 Edge or 1 Vert selected
- Face Add Mode: Create a new face with:
- • 2 edges sharing a vert
- • 3 or more verts selected - in Vertex Mode
Context Connect
Connect path between selected verts, subdivide geo, or activate the Knife tool.VIDEO
- Knife Tool:
- No elements are selected
- Only 1 vert selected
- Vertex Mode:
- Connect path between selected verts
- 2 selected verts, already connected (a vertex mode "edge selection") subdivides the edge.
- Edge Mode:
- 1 Edge : Subdivide (Switches to vertex mode to see added vert)
- >1 Edge: Subdivide, with options (+Selects new center edge loop afterwards)
- Face Mode:
- Splits middle along selection. Single face selection uses relative mouse position for direction.
- Options:
- Adjust Nr of evenly spaced cuts
- Square Corners On/Off
- Redo-Panel only in edge/face modes
Triple Connect Spin
Performs different operations depending on Edit Mesh selection mode:- Vertex: Connect Verts: Smart Path, Vertex Pair or Selected to Active
- Edge: Spin Edges
- Face: Triangulate
Context Slide
Alternative (and contextual) one-click option for double-G slide. Vert Slide in vertex mode, Edge slide in edge mode.Transform Tools Module
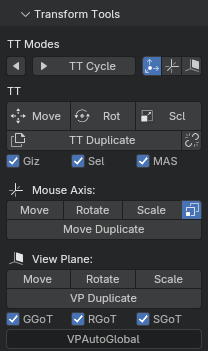
TT
The Transform Tools (TT) modes are 3 quick presets to toggle the initial state of the Transform Tool that's launched:- TT Modes
- Default - Blender Default (like "Grab" with or without handles)
- Mouse Axis - See description below
- ViewPlane - See description below
- TT Cycle
- Cycle between the TT modes (for TT move, TT rotate & TT scale
- Intended for shortcut use. (Mode is displayed by the TT Toggle Buttons)
- Also has a reverse cycle button
- TT Toggle Buttons
- Sets which of the TT modes is used
- Use as shortcuts, use TT Cycle, or click theTT viewport icons (manage placement in prefs)
- Transform Tools
- (TT) Move, (TT) Rotate and (TT) Scale can then replace each standard transform tool shortcut.
- (TT) Duplicate: Duplicate with toggle-able Data-Linking, using the TT modes for transform. Toggle linked button in viewport icons or kekit panel
- (TT) Linked (Duplicate): Always link-duplicates objects
(ignores TT Linked Toggle used by the regular TT Duplicate)
Tip: TT-Move & TT-Scale also works in the UV Editor defaulting to Mouse Axis with only mouse direction needed for axis-pick. (Shortcuts need to be assigned manually)
Note: TT modes (and Toggle) icons can also be displayed in the viewport header.
Options:
- Use Handles (Giz):
- Use handles. or not.
- Set Select Tool (Sel):
- Will set Select Tool when using TT. Disable to keep tool selection manual.
- Use Mouse Axis Scale (MAS):
- Uncheck to disable automatic axis locking just for TT Scale: Unlocked (standard) default.
- TT Dupe Linked Toggle:
- Will make linked duplicates
- Note: Also affects Mouse Axis Dupe and VP Dupe
Mouse Axis
Runs Grab, Rotate or Scale (Resize) with Axis auto-locked based on your mouse direction using recalculated* orientation based on the selected Orientation type (except Gimbal).VIDEO
*Orientation will be recalculated based on selected Orientation slot.
Note: If you set Normal Orientation in Edit Mode & go back to Object Mode, Local mode will be used, as there is no "Normal" orientation in Object Mode.
Note: If you set Normal Orientation in Edit Mode & go back to Object Mode, Local mode will be used, as there is no "Normal" orientation in Object Mode.
- Move Dupe:
- Duplicates selection first. Intended for "drag-copy" operation. For example, hotkey assigned like THIS
- Auto-Scale Mode:
- Toggle ("C" button) to use automatic scale constraint
- Unconstrained scaling if mouse pointer is over Object/Selected faces
- Else, axis constraint picked by mouse direction (Mouse Axis default)
View Plane
Locking the transform to a plane, by constraining transform to 2 of the 3 axis of movement. (Like using "SHIFT-X" in the regular 'grab' modal, for example - but automatic, based on the viewport camera)- VPDupe
- Duplicates selection before running VPGrab
- VP Grab / Rotate / Resize
- View Planes auto-locked based on your viewport rotation. VIDEO
- Global Or Tool:
- Grab, Rotate or Resize in auto locked view plane (like VPGrab etc. above) when in Global Orientation - otherwise launches blender default transform tools. IMAGE
- Auto Global:
- Will always set Global transform
- Note: Overrides Global or Tool
Clean-Up Tools Module

- Macro Mesh Clean
*Double/Loose/Degenerate Geo, Interior Faces, Collinear verts, Tiny Edges.
Example Image
- Run on Selected Object(s) in Object mode
- Select Only Mode or Clean Mode
- Tip: You probably want to run Select, fix geo manually & repeat!
- Tiny Edges
- Selects edges under the set minimum length limit (of usefulness)
- Select only: If any "valid" edges under the limit remain after Cleanup, these will always only be selected, not removed
- UV Usage
- Calculate and evaluate usage of the 0-1 UV area (single UDIM)
- By selected UVs in Edit Mode or all UVs in Object Mode
- Evaluations are for effective use of the UV space (~industry standard quality)
- Overlapping UVs will halt op, and the overlapping UVs will be selected
- Purge Tools
- Purge unused data blocks by category - or All
- Clean Dupe Materials
- Finds duplicate (*.001 etc.) materials in selected & assigns the original
- This works by simply checking if the material name ends with dot + nr
- VIDEO - Note: Dupe materials were created using Copy/Paste Objects (ignores prefs dupe settings, reported here) - Use keKit Copy/Paste+ to avoid dupes
- Clean Unused Materials & Slots
- Like "Remove Unused Materials" but also removes empty slots
- Selection Tools
- Select Unapplied - Select all objects with Unapplied Scale and/or Rotation
(& Unselects applied objects) - Select Collinear Verts (Edit Mode)
Adjust Collinear Tolerance setting to select more/less - Select Flipped Normal Faces - Edit Mode (Options in Redo Panel)
- Select Elements by vert count - in selected Object(s) (Edit or Object Mode)
E.g: Use 5+ to select all Ngons - Check Snapping
- Selects object's verts that share coords with another (selected) objects verts
- VIDEO
- Check Origin at Vert
- Checks if the origin shares coordinates with any vertex: VIDEO
- Select Occluded Verts
- Selected Object(s) verts occluded "inside" the Active Object VIDEO
- Works with multiple selected "occluded" objects - VIDEO
- (Note: May take a few seconds on heavy meshes)
Pie Menus Module
ke Pie Menus
The keKit Custom Pie Menus either expands (and replaces) the default Blender counterparts, are or keKit specific.(old) VIDEO (YT)
Tip: Transparency on box menu backgrounds in the viewport is not recommended for keKit Pie menus.
Fix: IMAGE
Blender Default Pie Menus
These are listed here mostly for shortcut reference & handling (RMB for pop-over info).
Note: The images of menus, panels etc. on this page are not updated to always be 100% up to date.
keSnapping
Snapping layout using built in snapping tools with an options panel.Complete blender snapping settings & Snapping Combos


keOrientPivot
Blenders Orientation & Pivot panels + OPC Combo Slots


keShading
Shading pie replacement with extra options for quick access.BG Sync, Studio Lighting, HDR backgrounds etc.

keOverlays
Viewport shading pie menu -for quick access to scene & object shading options.
All Edge Overays: Toggles the 4 edge shading modes at once.
All Overlays: Toggles all overlay options on or off.
(old) VIDEO (YT)

keSnapAlign
Snap/Align menu replacement with more functionality.- Cursor Fit & Align
- Align Origin to Selected / Cursor
- Align Object to Active / Cursor
- Swap Places
- ZeroScale options:
- V / H: Scales selected elements to axis nearest screen vertical or horizontal
- Normal: Using active element as basis for scaling
- Cursor: Using cursor location & z-rotation as basis for scaling
- VIDEO (YT)


keFitPrim
Pie Menu for FitPrimEdit & Object Mode layouts.
Note: New Objects can also be created from the Edit Mode pie.

keMaterials
Menu for ID Materials combined with Material Utils menu,(if you have the Material Utils add-on enabled)
Automatic column sorting for large amounts of existing materials: IMAGE
Tip:
Max Nr of materials displayed can be set in Material Utils add-on prefs.

keStepRotate
Preset step rotations for selected object(s) - using Step Rotate45, 90 and Op.Rot degrees (either way), axis plane based on the view.
Op.Rot - Will use the previously used values: VIDEO DEMO
Orientations: Global, Local, Cursor & View (all else defaults to use Global)
- Scale Applied validation/apply feature in the top slot determines if object scale is not 1,1,1 - and the button can then be used to Apply Scale.
- Clear buttons for Location, Rotation and Scale, and each rotation Axis
- Mini-box rotation values (Experimental Mode Only)
- Straighten

View & Cursor Bookmarks
Pie menu access for View & Cursor Bookmarks
MultiCut
Pie menu access for MultiCut presets.
keSubd
Useful things for a simple semi-procedural Subd-Workflow, adding & managing various modifiers, other than just SubD. (WIP - This entire pie menu is Experimental Mode Only)Updates:


keMisc (Modeling)
Miscellaneous scripts (& vanilla blender tools) for modeling that I don't use often & aren't mouse dependent.Or, not often enough for shortcuts, or I keep forgetting them.
Some I do use shortcuts for, but they fit well in the pie menu.
- Also features icon-only Edit & Object Mode Tool Options
- Pie Menu Items are different in Edit vs Object Mode
Bool Tool
- A custom pie menu alternative to the BoolTool Menu
- Note: The "cog" icon (⚙) pie slots represents the live modifier variant
- Includes the "new" Carve Tool (4.2+ only) - YouTube Demo Video (3rd Party)
- Requires the Bool-Tool Add-on (comes with Blender - activate it)
- Edit Mode: Has (more destructive) Boolean-type operators (+ "Carve" tools):
Intersect (Boolean) Difference, Union & Intersect ops, Intersect (Knife) and keKit ops:
Bool Knife, Active Slice, Extrude Along Edges & Nice Project
keBevel
The Bevel Modifiers' Edge Weight Attribute support (B4.3+) enables more flexible Bevel workflows.The 'Edge Groups' (unofficial shorthand for the 'Edge Attribute layers') can be managed by the keKit Bevel Pie Menu.
The Menu is thus only for B4.3+. (Most useful in Edit Mode).
- Modifier Focus - ICON/NAME of listed modifier sets Modifier to Active and collapse others listing in properties panel
- Note: The Bevel Pie Menu will manage any mode of the Bevel Modifier (not just Edge Groups)
- Includes a pie slot for Bevel Tweaker Edit Mode Bevel Modifier tweaking.
- Also available as an integration option for Bevel Tweakers Edit Mode for use with new Bevels (if BT Auto-options is enabled) (to make it possible for both to share a single shortcut)
* * *
keKit © Copyright - Kjell Emanuelsson
Blender GNU General Public License [GPLv3] & CC-BY-4.0