↲ FRONT PAGE ↲ I2M PAGE
Image 2 Mesh [Legacy 1.2] - Guide
[ Deprecated ] - The Latest version of this guide is available HERE.
Basics
How do I install I2M?
Just like any other Add-on. Please read the Blender Documentation.
General Blender functionality is out of scope for this guide, as well as I2M support.
Please direct beginner Blender questions to an appropriate forum.
Before you begin
I2M expects an Alpha-channel*. Please make sure your image actually has an Alpha-channel.
The following image formats types can be used with I2M: PNG, TIF, EXR, HDR & TGA.
* You can also use a specified RGB-value ("a color") instead of alpha. See below.
"How do I make sure there's an Alpha-channel?"
General image handling is out of scope for this guide, as well as I2M support.
Please direct general image questions to an appropriate forum.
Add-on Preferences
Once installed & enabled, the following options are available in Add-on preferences for I2M:
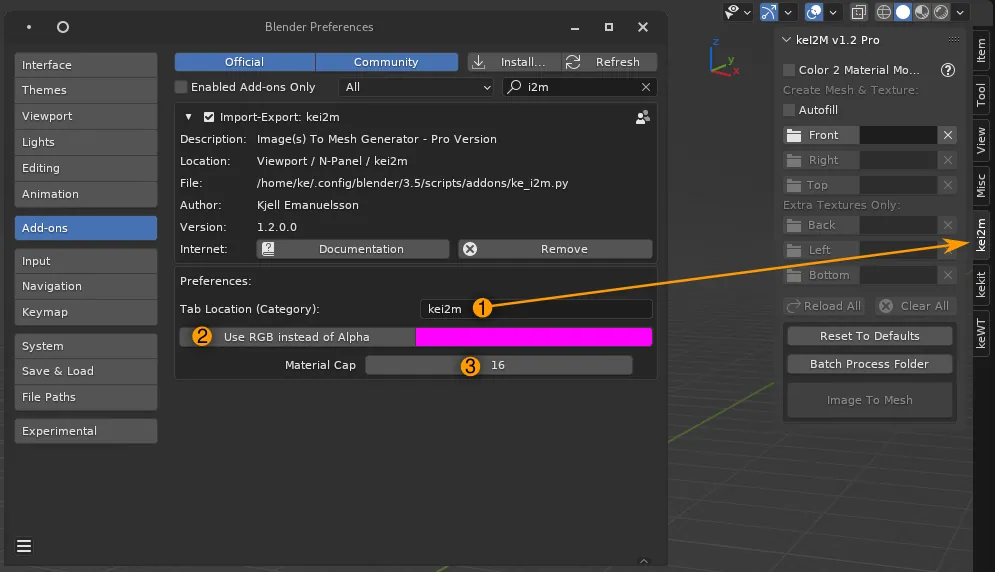 1. Tab Location Option: Override the default "keI2m" tab name to relocate the add-on on the n-panel.
2. RGB instead of Alpha option:
- Click the LEFT button (with the "Use RGB instead of Alpha" text) to activate this option.
- Click the RIGHT button (the color field) to specifiy which color is to be used instead of Alpha.
3. Material Cap: Limits the amount of materials that can be generated by the Color 2 Material mode. (See below.)
Tip: You can mouse-over almost any item, such as buttons, for tooltips.
Step-By-Step
A simple "First Time" process to get you started:
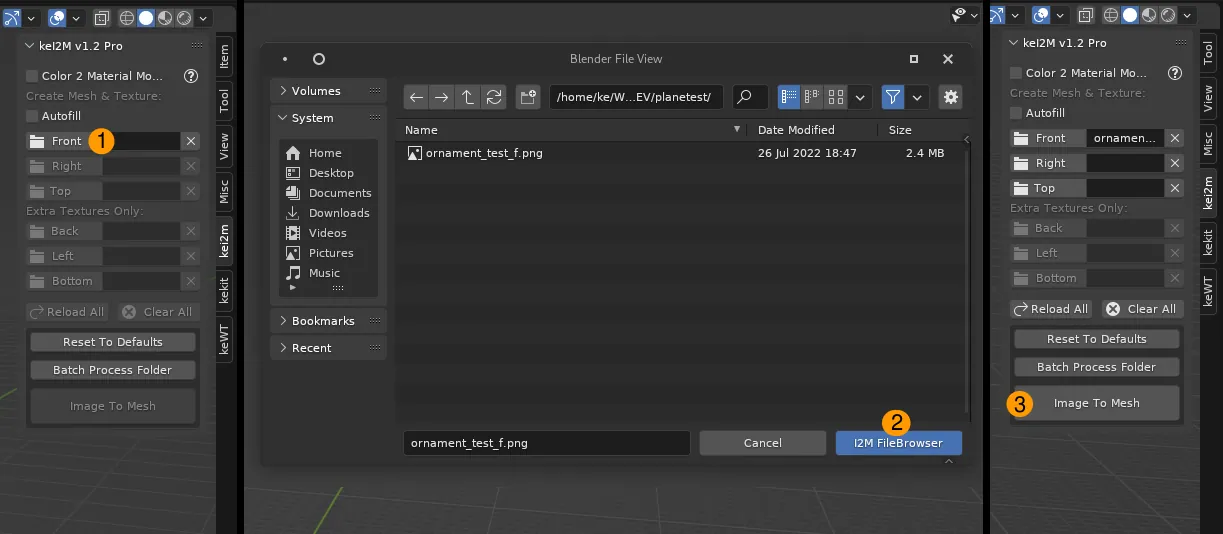
1. Click the "Front" button.
2. In the pop-up browser; Select an image with an Alpha-channel in PNG, TIF, EXR, HDR or TGA format.
3. Click the "Image To Mesh" button to generate a mesh from the loaded "Front" image.
A mesh object should now be generated at location 0,0,0.
If not, you can use the support form, assuming you have read & followed all the information in this guide. Include any image used as an attachment, if possible.
The generated object will have UV texture projection automatically setup (unless using "Apply All Modifiers", below.)
This is useful for further modeling without having to deal with UV's.
Tip: "Bake" the UV's by applying the modifier, when finished, for export, etc.
Note: General I2M use-cases can be seen demonstrated in the original Youtube Demo or the Update Video.
Settings - Plane Geo Type
You can now tweak the settings in the Redo Panel:

Opacity Tolerance
Determines the cut off point off the alpha value. Do not use as slider! Use numerical keyboard input.
Tip: Should the Tolerance & Expand options be insufficient, you may need to manually adjust the alpha in an image editing app.
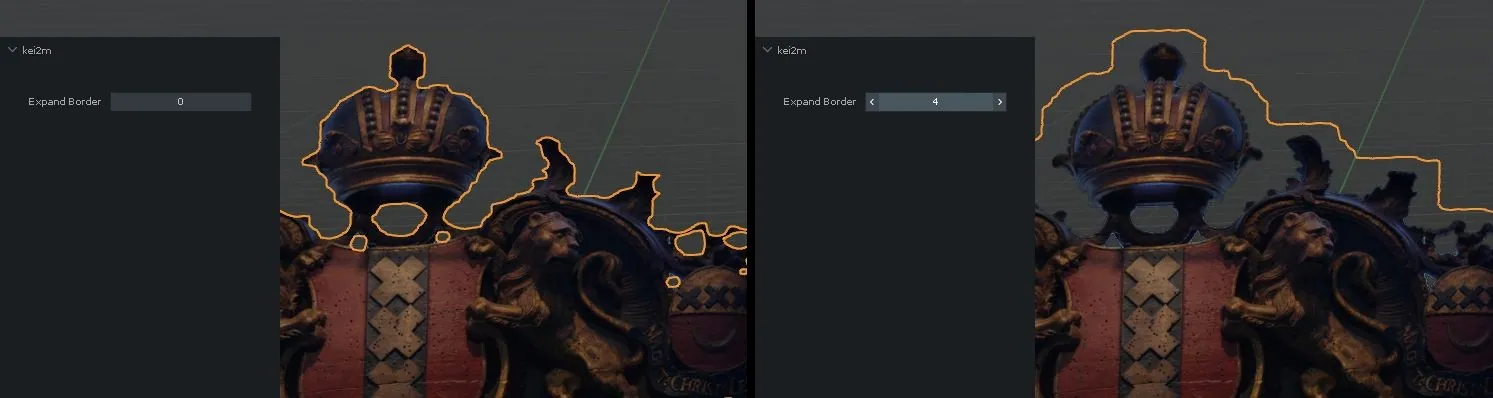
Expand Border
Expands or Contracts alpha cut-off point beyond the original image alpha borders. Zero to disable.
Tip: Tweak Opacity Tolerance value first - only use Expand Border if necessary.
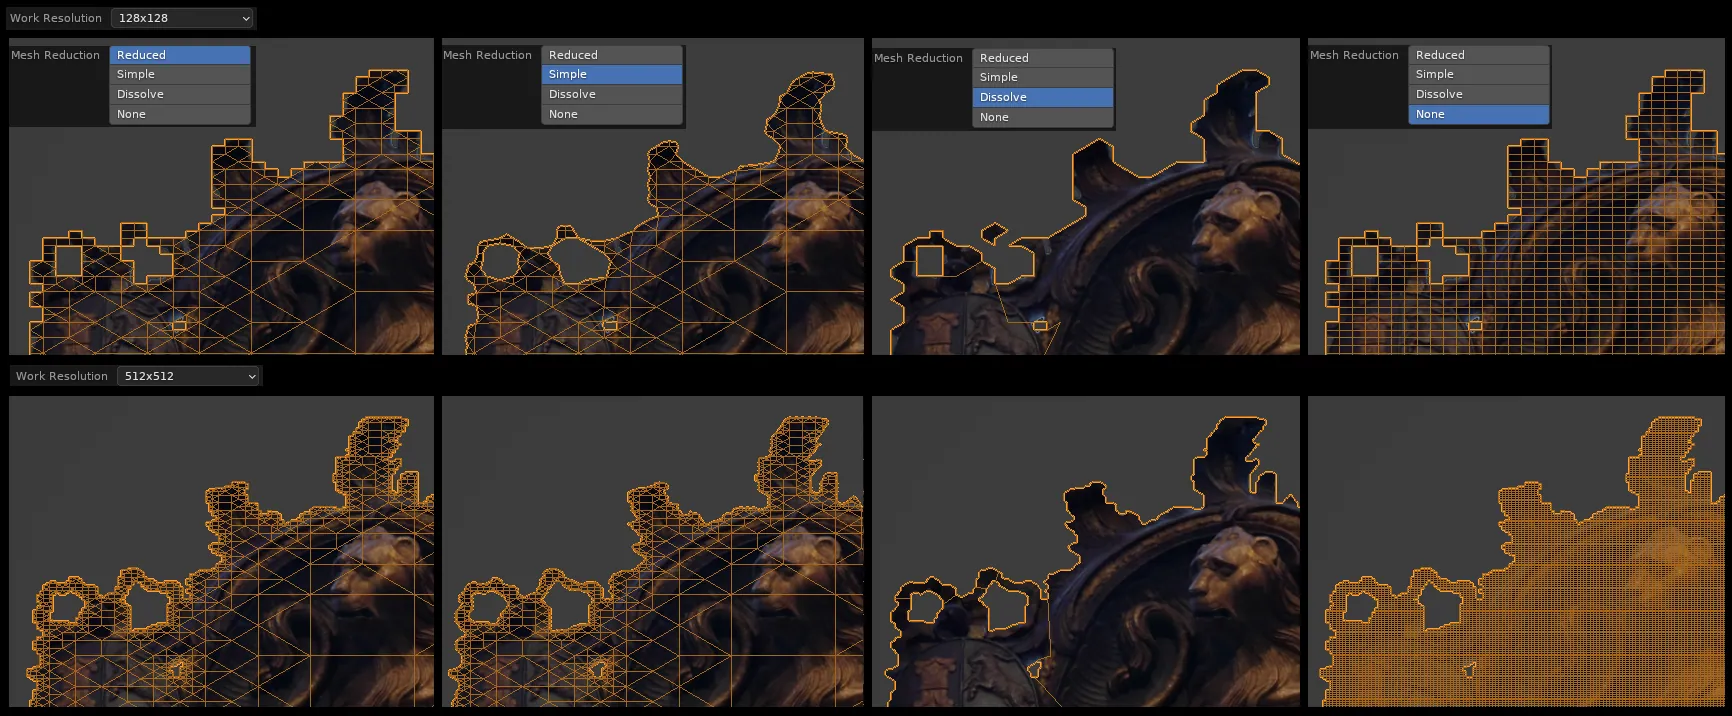
Work Resolution
The Work Resolution in tandem with Mesh Reduction, are probably the most important settings.
Work Resolution refers to the internal pixel resolution used by I2M, which will probably be lower than the actual resolution of the image - for performance reasons. Keep this value as low as you can. Increase as a final step to ensure you have the necessary detail level.
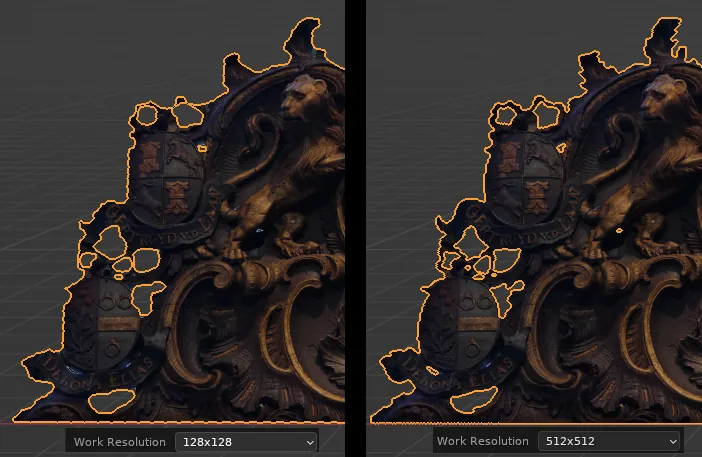
NOTE: The last used Work Resolution will be used for any additional image(s) as well, unless you click the "Reset To Defaults" button or load a new scene.
Custom Resolution
Any value above 0 overrides the Work Resolution. The one value is used for both X&Y. Use with caution.
Size
Autofit (Default): Automatically fits all resolutions to 1 Blender Unit (1 meter).
Width: Set custom mesh size/width.
Pixel: Calculate size based on set custom pixel size/width. Video example.
Geo Type
Which type of geo conversion to use. Note: Screw & Boolean modes are covered separately below.
Plane: Uses front image slot to generate a single plane of geometry.
Screw: A Screw Modifier revolves one side of an image (front image slot), to a cylindrical shape.
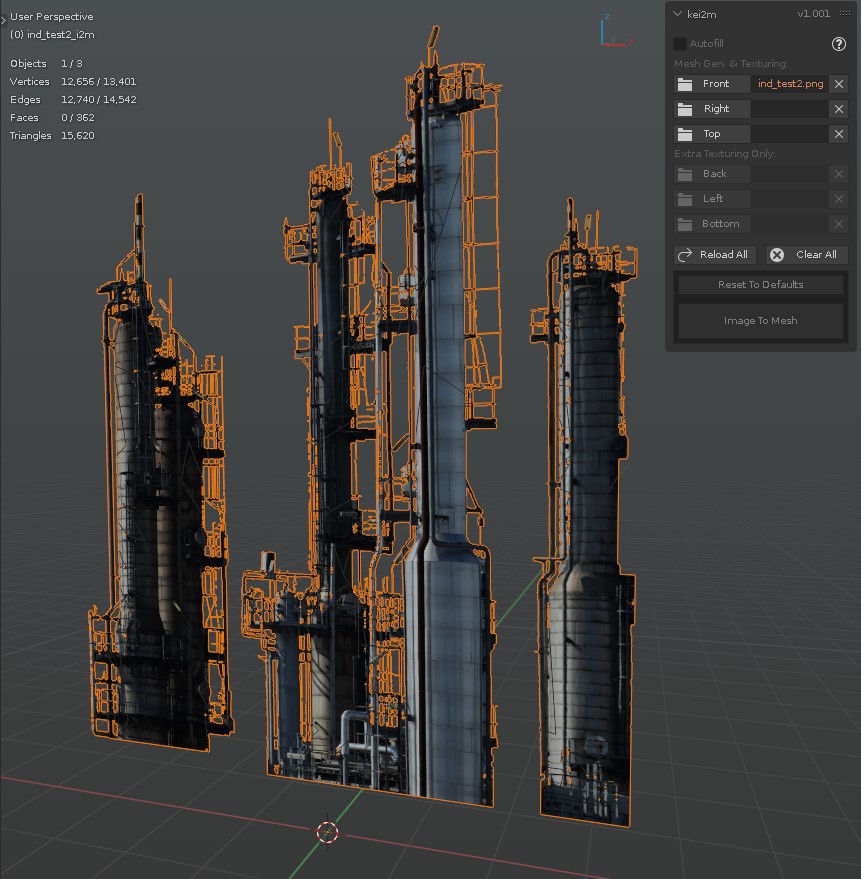
Boolean: Uses 2-3 images (front + right/top) to carve out a rough 3d shape using Intersect, with 3 optional additional images for full texture projection coverage. Very basic, do not expect wonders!
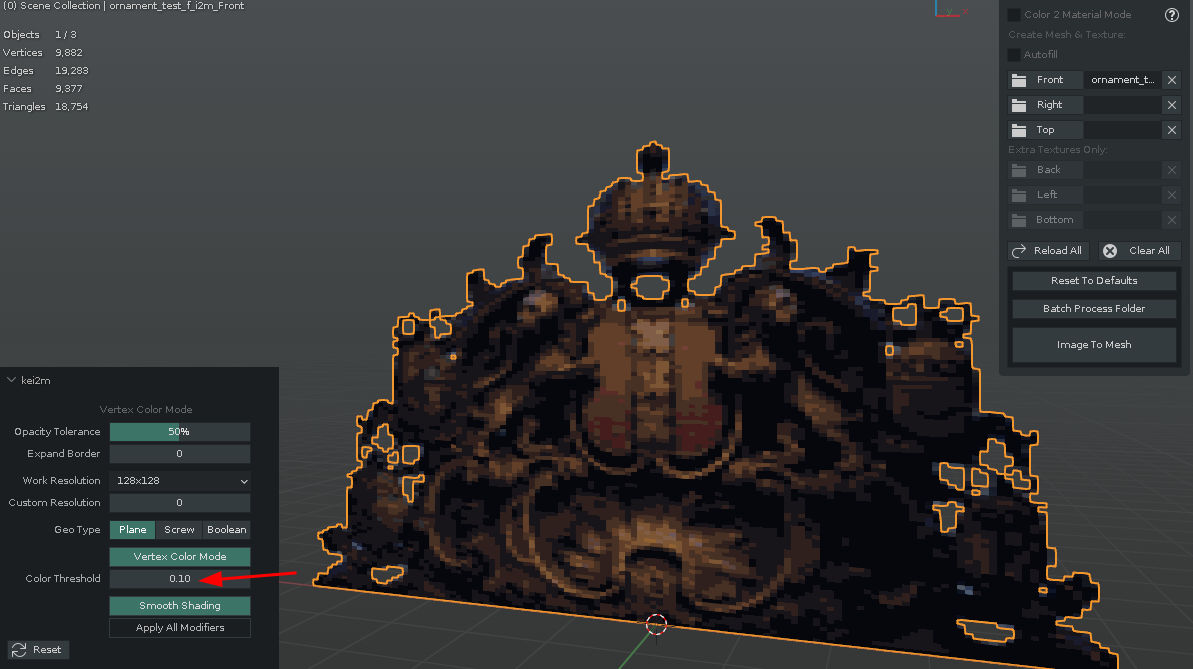
Vertex Color Mode
Aka 'Retro Pixel Graphics Mode': Each Work Resolution pixel makes up one face, like with Mesh Reduction set to "None", but uses Vertex Color instead of texture(s). The shading mode will be set to display Vertex Maps automatically.
Color Threshold:
When using Vertex Color Mode, this options is available to adjust the color range, effectively limiting the "palette".
0 = No limit (full rgb) in Vertex Color Mode (Also Faster). Sensitive: Try steps of 0.05 (Also, very slow! Do not use as slider! Use numerical keyboard input!
Mesh Reduction
This will determine how the contour and interior of the mesh is processed:
Tip: In most browsers, you can enlarge any image in this guide by Right Mouse button clicking the image and choosing "Open In New Tab".
Reduced: Reduces the interior surface, but not the contour.
Simple (Default): Reduces both interior surface and contour.
Dissolve: Reduces both and also applies a dissolve process to non-border edges. Caution: Very slow.
None: No reduction - Every pixel (of the work resolution) becomes a quad.
Note: The complexity of the Alpha will also have an effect on the processing time. High frequency detail / noise will increase processing time & mesh complexity. This is an example of complex alpha.
Smooth Shading
Sets object to smooth shade & Auto-smooth.
QnD Materials
Will add Quick-n-Dirty Roughness and Bump nodes to the generated object's material - in addition to color. Based on the color input.
Apply All Modifiers
Applies the Screw (if used) & UV Projection Modifiers and removes created Empties. Leave off to leave modifier live (for live uv projection modeling etc).
Reset
Reset to defaults.
Settings - Screw Geo Type
A Screw Modifier revolves one side of an image (front image slot), to a cylindrical shape. (The image should be centered. Only one half will be used for mesh generation. UV will still be projected using the whole image.)
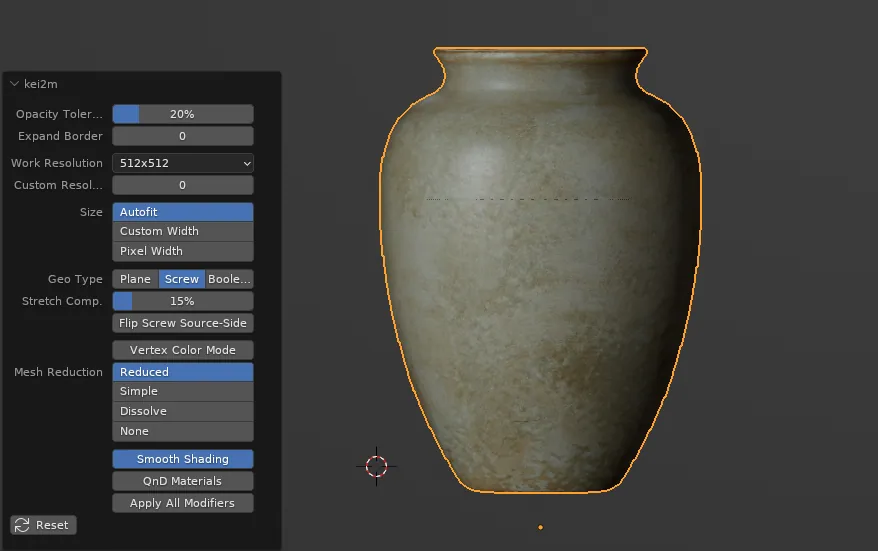
Stretch Compensation : Stretches the UV-projection to compensate for curvature issues.
Flip Screw Source-Side : Screw will use either left or right side of the image to revolve around.
See Planar Geo Type above for shared options.
Settings - Boolean Geo Type
Uses 2-3 images (front + right/top) to carve out a rough 3d shape using Intersect, with 3 optional additional images for full texture projection coverage. Very basic, do not expect wonders!
Note: Boolean Geo Type will automatically be set if you load more than one image slot.
Autofill : Check this to enable Auto-Fill slots by suffixes when loading. You only need to select the Front image to load all images in the same folder with the same name & valid suffixes: _front, _right, _top, _back, _left, _bottom.

Front Texture Only : Will only use the Front image for texture projection.
See Planar Geo Type above for shared options.
Color 2 Material Mode
Splits the mesh by the (single Plane) image colors, and assigns a unique material per color.
Material limit is set in I2M Add-on prefs.
Will only work with clearly distinct & separated colors. Best with no color gradients, including anti-aliasing.
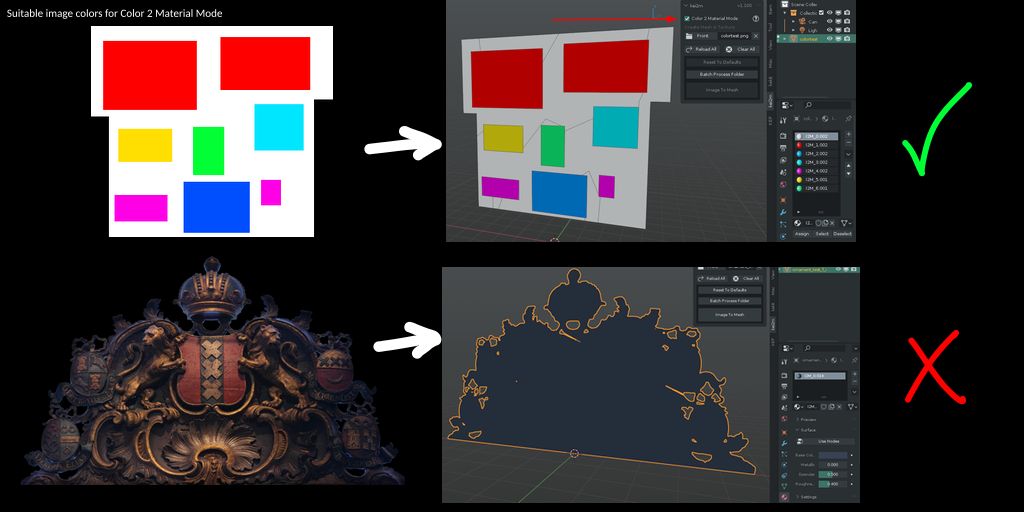
Mesh Smoothing : Will clean-up / smooth the color split boundaries.
Batch Process Folder
Click button to open a browser, select a folder to batch with the current/previous I2M settings. Does not work with Boolean geo type.
Basics
How do I install I2M?
Just like any other Add-on. Please read the Blender Documentation.
General Blender functionality is out of scope for this guide, as well as I2M support.
Please direct beginner Blender questions to an appropriate forum.
Before you begin
I2M expects an Alpha-channel*. Please make sure your image actually has an Alpha-channel.
The following image formats types can be used with I2M: PNG, TIF, EXR, HDR & TGA.
* You can also use a specified RGB-value ("a color") instead of alpha. See below.
"How do I make sure there's an Alpha-channel?"
General image handling is out of scope for this guide, as well as I2M support.
Please direct general image questions to an appropriate forum.
Add-on Preferences
Once installed & enabled, the following options are available in Add-on preferences for I2M:
1. Tab Location Option: Override the default "keI2m" tab name to relocate the add-on on the n-panel.2. RGB instead of Alpha option:
- Click the LEFT button (with the "Use RGB instead of Alpha" text) to activate this option.
- Click the RIGHT button (the color field) to specifiy which color is to be used instead of Alpha.
3. Material Cap: Limits the amount of materials that can be generated by the Color 2 Material mode. (See below.)
Tip: You can mouse-over almost any item, such as buttons, for tooltips.
Step-By-Step
A simple "First Time" process to get you started:
1. Click the "Front" button.
2. In the pop-up browser; Select an image with an Alpha-channel in PNG, TIF, EXR, HDR or TGA format.
3. Click the "Image To Mesh" button to generate a mesh from the loaded "Front" image.
A mesh object should now be generated at location 0,0,0.
If not, you can use the support form, assuming you have read & followed all the information in this guide. Include any image used as an attachment, if possible.
The generated object will have UV texture projection automatically setup (unless using "Apply All Modifiers", below.)
This is useful for further modeling without having to deal with UV's.
Tip: "Bake" the UV's by applying the modifier, when finished, for export, etc.
Note: General I2M use-cases can be seen demonstrated in the original Youtube Demo or the Update Video.
Settings - Plane Geo Type
You can now tweak the settings in the Redo Panel:
Opacity Tolerance
Determines the cut off point off the alpha value. Do not use as slider! Use numerical keyboard input.
Tip: Should the Tolerance & Expand options be insufficient, you may need to manually adjust the alpha in an image editing app.
Expand Border
Expands or Contracts alpha cut-off point beyond the original image alpha borders. Zero to disable.
Tip: Tweak Opacity Tolerance value first - only use Expand Border if necessary.
Work Resolution
The Work Resolution in tandem with Mesh Reduction, are probably the most important settings.
Work Resolution refers to the internal pixel resolution used by I2M, which will probably be lower than the actual resolution of the image - for performance reasons. Keep this value as low as you can. Increase as a final step to ensure you have the necessary detail level.
NOTE: The last used Work Resolution will be used for any additional image(s) as well, unless you click the "Reset To Defaults" button or load a new scene.
Custom Resolution
Any value above 0 overrides the Work Resolution. The one value is used for both X&Y. Use with caution.
Size
Autofit (Default): Automatically fits all resolutions to 1 Blender Unit (1 meter).
Width: Set custom mesh size/width.
Pixel: Calculate size based on set custom pixel size/width. Video example.
Geo Type
Which type of geo conversion to use. Note: Screw & Boolean modes are covered separately below.
Plane: Uses front image slot to generate a single plane of geometry.
Screw: A Screw Modifier revolves one side of an image (front image slot), to a cylindrical shape.
Boolean: Uses 2-3 images (front + right/top) to carve out a rough 3d shape using Intersect, with 3 optional additional images for full texture projection coverage. Very basic, do not expect wonders!
Vertex Color Mode
Aka 'Retro Pixel Graphics Mode': Each Work Resolution pixel makes up one face, like with Mesh Reduction set to "None", but uses Vertex Color instead of texture(s). The shading mode will be set to display Vertex Maps automatically.
Color Threshold:
When using Vertex Color Mode, this options is available to adjust the color range, effectively limiting the "palette".
0 = No limit (full rgb) in Vertex Color Mode (Also Faster). Sensitive: Try steps of 0.05 (Also, very slow! Do not use as slider! Use numerical keyboard input!
Mesh Reduction
This will determine how the contour and interior of the mesh is processed:
Tip: In most browsers, you can enlarge any image in this guide by Right Mouse button clicking the image and choosing "Open In New Tab".
Reduced: Reduces the interior surface, but not the contour.
Simple (Default): Reduces both interior surface and contour.
Dissolve: Reduces both and also applies a dissolve process to non-border edges. Caution: Very slow.
None: No reduction - Every pixel (of the work resolution) becomes a quad.
Note: The complexity of the Alpha will also have an effect on the processing time. High frequency detail / noise will increase processing time & mesh complexity. This is an example of complex alpha.
Smooth Shading
Sets object to smooth shade & Auto-smooth.
QnD Materials
Will add Quick-n-Dirty Roughness and Bump nodes to the generated object's material - in addition to color. Based on the color input.
Apply All Modifiers
Applies the Screw (if used) & UV Projection Modifiers and removes created Empties. Leave off to leave modifier live (for live uv projection modeling etc).
Reset
Reset to defaults.
Settings - Screw Geo Type
A Screw Modifier revolves one side of an image (front image slot), to a cylindrical shape. (The image should be centered. Only one half will be used for mesh generation. UV will still be projected using the whole image.)
Stretch Compensation : Stretches the UV-projection to compensate for curvature issues.
Flip Screw Source-Side : Screw will use either left or right side of the image to revolve around.
See Planar Geo Type above for shared options.
Settings - Boolean Geo Type
Uses 2-3 images (front + right/top) to carve out a rough 3d shape using Intersect, with 3 optional additional images for full texture projection coverage. Very basic, do not expect wonders!
Note: Boolean Geo Type will automatically be set if you load more than one image slot.
Autofill : Check this to enable Auto-Fill slots by suffixes when loading. You only need to select the Front image to load all images in the same folder with the same name & valid suffixes: _front, _right, _top, _back, _left, _bottom.
Front Texture Only : Will only use the Front image for texture projection.
See Planar Geo Type above for shared options.
Color 2 Material Mode
Splits the mesh by the (single Plane) image colors, and assigns a unique material per color.
Material limit is set in I2M Add-on prefs.
Will only work with clearly distinct & separated colors. Best with no color gradients, including anti-aliasing.
Mesh Smoothing : Will clean-up / smooth the color split boundaries.
Batch Process Folder
Click button to open a browser, select a folder to batch with the current/previous I2M settings. Does not work with Boolean geo type.
[EOF]