↲ HOME PAGE ↲ KEWT PAGE
[keWT] ke World Texture - Guide / Manual
Basics / FAQ
Q1: How do I install the Add-on?
Standard (Extension - since keWT 2.0) Add-on installation - Please read the Blender Documentation.Q2: How do I [insert Blender functionality here]?
General Blender functionality is out of scope for this guide - Please direct Blender questions to an appropriate forum, if not covered in the Blender Documentation.Q3: What does "World Texture" mean?
This is an archaic game-dev term for textures made for brush geometry ("the game world") as a separate category from textures made for animated characters and other non-brush models. Or, atlas/tileable VS baked. Similar nomenclature can maybe be found in terrain/landscape systems. Also; whimsy acronym.Q4: Is keWT free?
If you want! keWT is tip-ware: feel free to set your own price (when using Gumroad for instance) to give me a tip if you find keWT useful. Note: No additional support/features/anything is granted + GPL3 terms & conditions apply.Q5: Can I use the latest version of keWT with Blender [version nr]?
Maybe. If not, all the previous releases are available on Gumroad (you may need to search the relase notes for version changes yourself). Note: There is no support guaranteed for any version.If you find any bugs: Bug reports using the support form are welcome!
keWT - Render Pass Baking for Blender
Add-On Preferences
Once installed & enabled, the following options are available in Add-on preferences: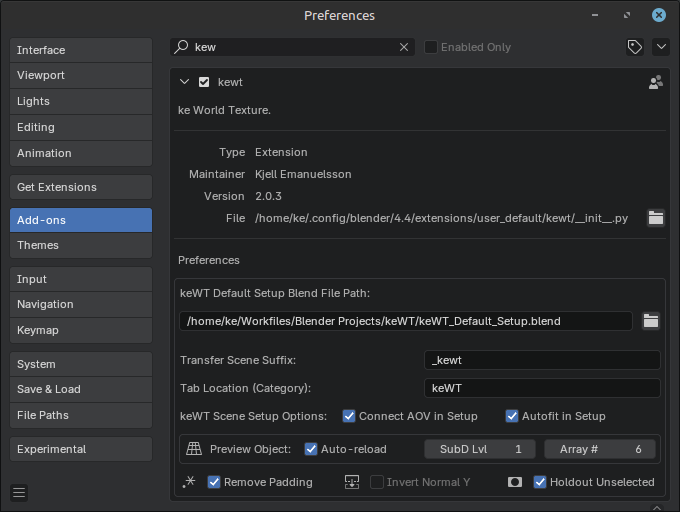
Make sure the keWT Default Setup Blend File Path is pointing to the blend file included with the zip.
Strongly Recommended: Move the keWT Default file from the Blender user directory to somewhere (safe) to avoid having to update the path (or overwriting a customized one!) when updating Blender or keWT.
Options:
Transfer Scene Suffix - Will be used when creating new keWT-setup scenes (see next step)
Tab Location - Relocate the keWT tab, if you want
Scene Setup Options - Automate material connections & area adjustment (see next step)
Preview Object Options - Global presets for Preview Object
Remove Frame Padding - Removes the numbering from render output files (as they are not needed)
NOTE: Frame padding removal is removed in v2.5: Not needed anymore since Blender 5.0!
Invert Normal Y - Whichever way your target application requires
Mask Unselected Holdout - "keWT Layer 2" preset option (see "View Layers")
Tip: This document will go through each of the steps, but, you can always use the pop-up tool tips on all the operators and values in Blender for more condensed info as a reminder.
Pipeline / Setup Process
1. Scene Setup
OK! For this demo scenario, we are ready to "render-bake" a collection of photogrammetry models into a texture.The keWT Camera will render from above (Z-axis, at origo), so the models are placed accordingly.
Note: While the Objectile and Find Overlap tools are available before setup, they are covered later in this document.
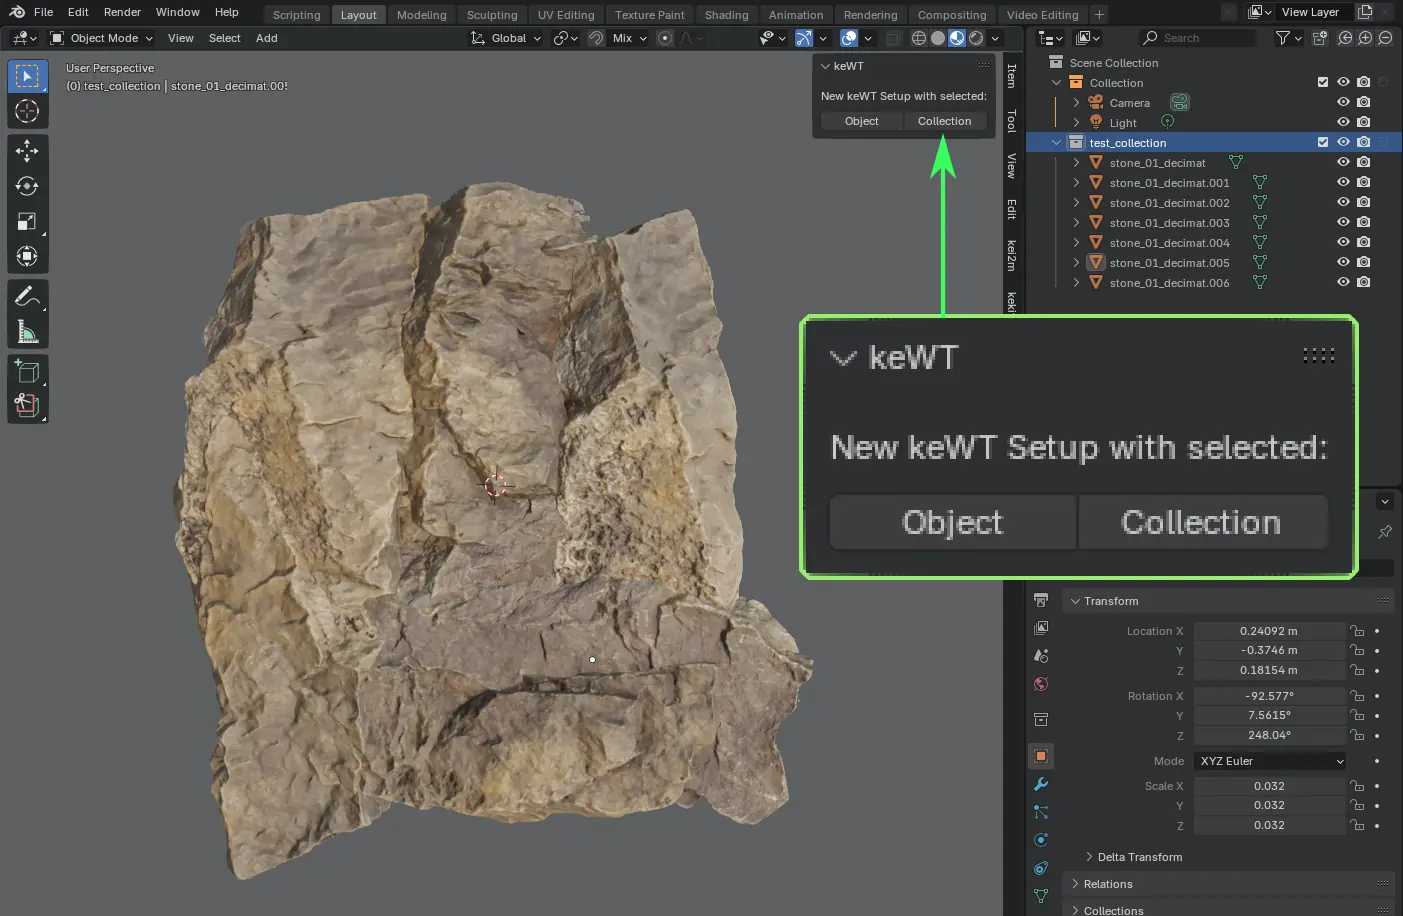
Choose if you want to setup selected Object, or selected Collection (of many objects):
Note: The obj/collection name will be used as texture base name. (This can easily be changed later)
- Setup is based on the keWT Default Setup Blend File (Defined in add-on prefs)
- keWT will automatically create a new blend file with a selected object or collection using the Default Setup file
- The new file name will be the selected items name + "_kewt" (suffix defined in add-on prefs)
- The new file will be in the same folder as the original file (& later render outputs in a new subfolder)
- Load the default scene file
- Append your model(s) from another blendfile
- Save scene as something different (to avoid overwriting the default scene)
- Enter paths & naming manually (see next step)
- Height adjust area (if you want to maximize range)
- Run "Connect AOV Outputs"
2. Output Path & Naming
Once the new keWT scene is setup, the full menu UI should be available and reference objects (empty) set up.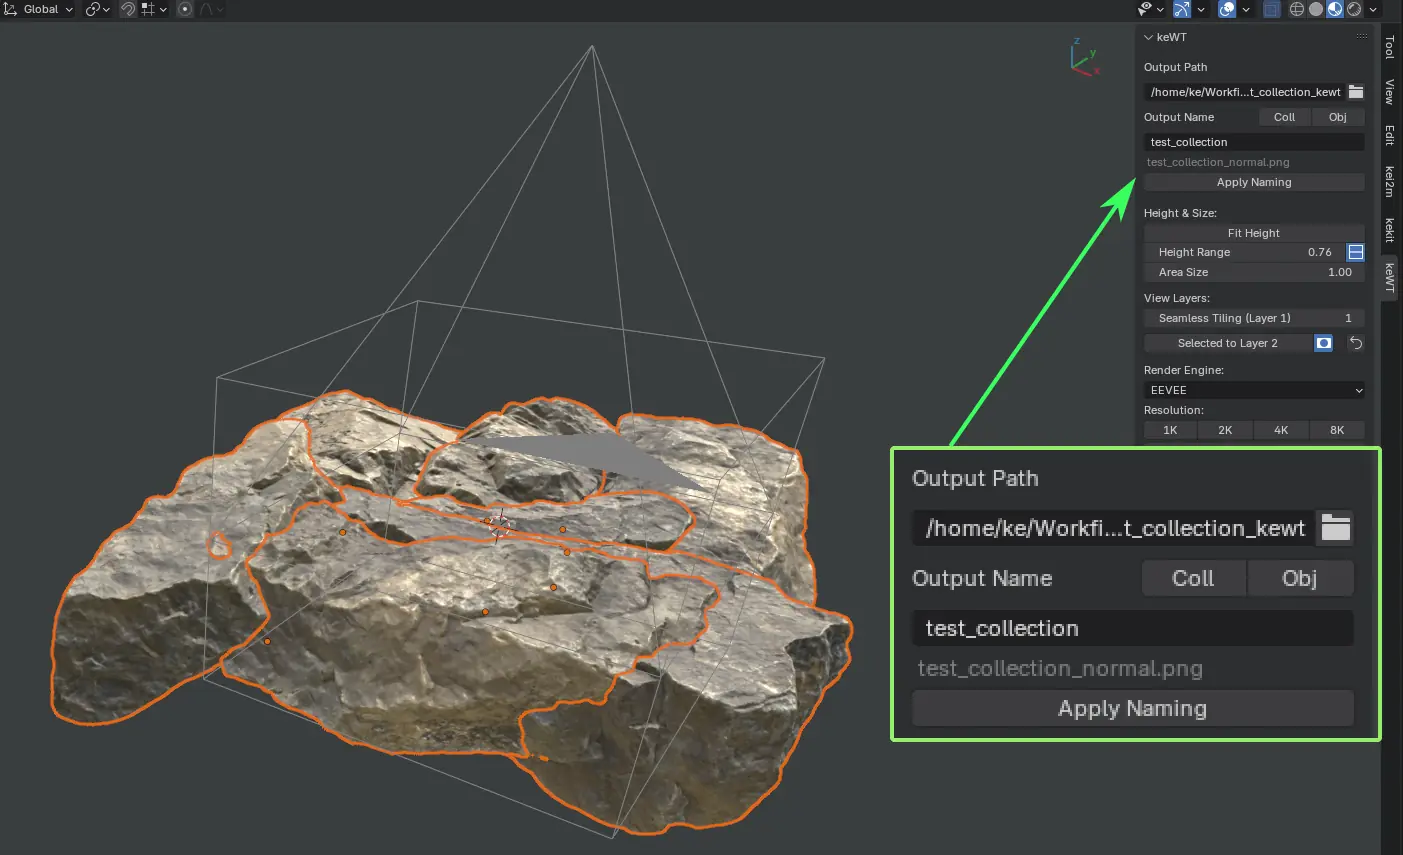
Adjust Output path and naming if the automatic setup doesn’t work for whatever reason, or if you are not using the automated process.
3. keWT Settings
Height Range & Area Size
The "Use Negative Range" option will determine how the Height Range value is used to set the depth for the height map output. This is also represented with a 3D reference box empty (updated when the value is changed):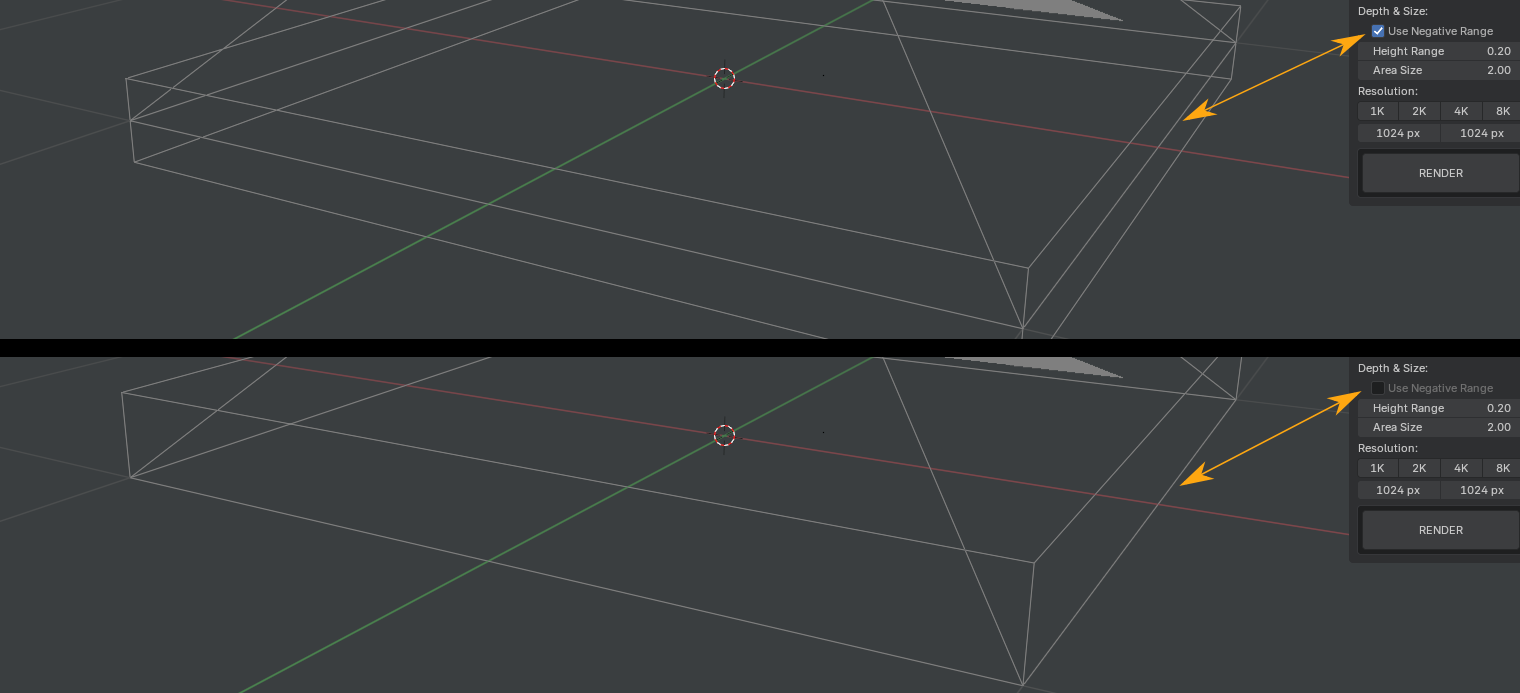
Fit Range - Automatically fit the area height to the selected objects
Mind the bottom with negative scale: Bottom side z value will be used for max range if it has more distance to fit all.
Negative Range ON:
The value will be divided in two, for 100% black to be at the negative half min value, mid level gray will be at world space Z0 and 100% white will be at the positive half max value.
Negative Range OFF:
100% Black is at Z0 and 100% white will be at the Height Range value (in world space Z-axis).
Area Size
This value sets the physical size in meters( or Blender Units, in X & Y) that will be rendered by the camera, framed by the 3D reference box (that is updated in real-time when the value is changed).
View Layers
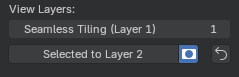
By default, all the imported objects are in the default view layer (Layer 1).
Objects in Layer 1 can use the Seamless Tiling feature. This slider affects the variable in compositing: "1" = On, "0" = Off. (Might be changed to a boolean checkbox at some point).
Objects in Layer 1 can use the Seamless Tiling feature. This slider affects the variable in compositing: "1" = On, "0" = Off. (Might be changed to a boolean checkbox at some point).
Some things will not work well with the seamless tiling:
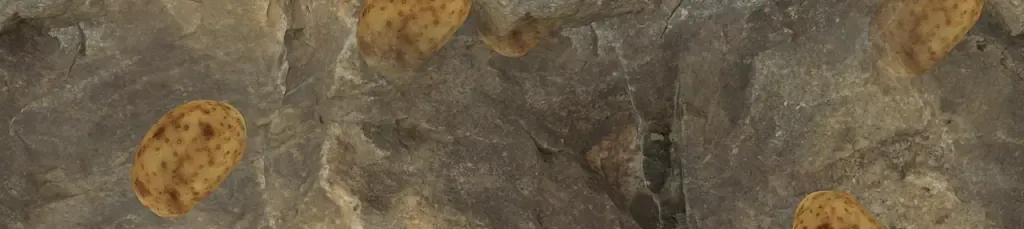
"Fading potatoes"
Layer 2 can be used in addition to Layer 1, to exclude objects from the the seamless tiling ("manual tiling"), all rendered at the same time. Use the "Selected to Layer 2" operator to move selected objects to Layer 2 - with the masking option on to also set the other objects masked out in Layer 2.
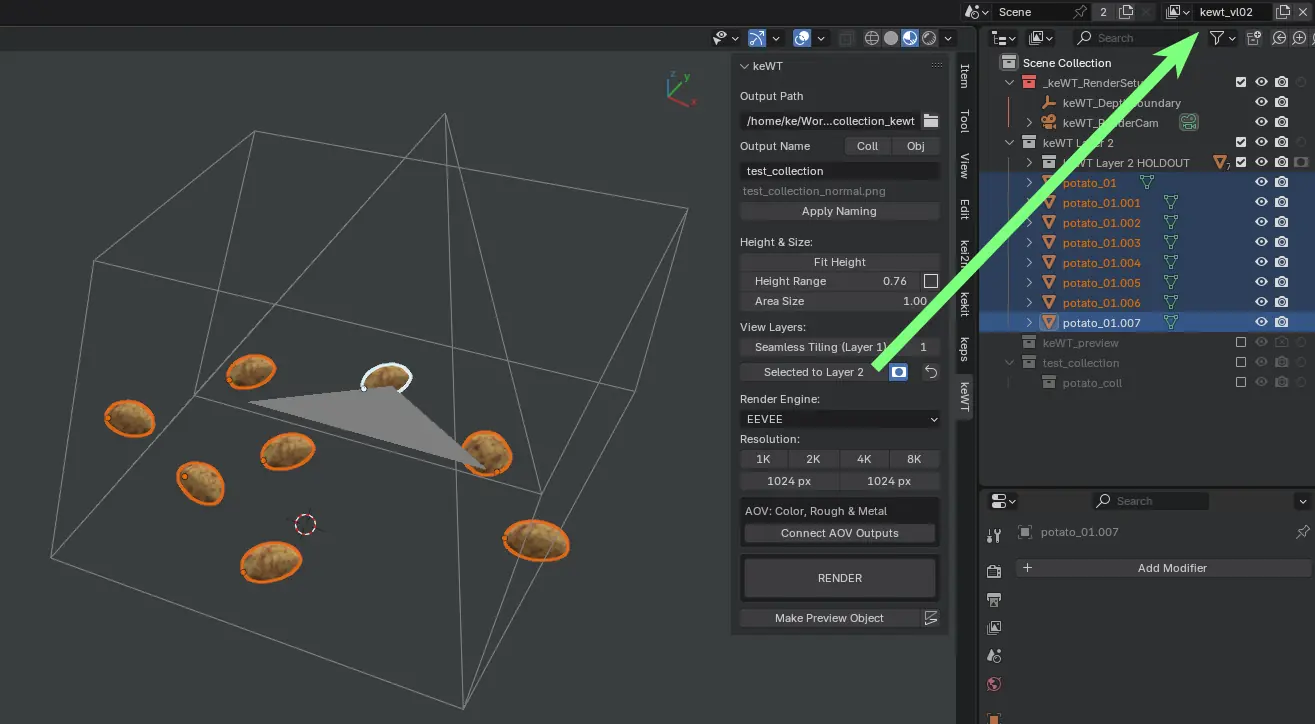
Preview Object Example: Layer 1 (automatic seamless tiling) + Layer 2 (manual tiling) combined
Adjust seamless tiling masking options & more info in Compositing section.
Engine Choice
The Default Setup scene is heavily customized both for EEVEE and Cycles, though EEVEE is much faster.Most of the features in cycles are useless as this is mostly data transfer.(GI, denoising etc. are turned off)
EEVEE might not work for all use-cases, like adaptive subdivision for use with high quality displacement.
(For baking objects with displacement maps Cycles is the better choice)
By default, the Cycles sampling level is set very low. Tip: Don't bother increasing it until you need to!
Cycles AO levels have been roughly matched to EEVEE’s, so one can use either one, without it being too much of a difference (in contrast mostly - they may still look a bit different, YMMV).
Anti-aliasing nodes are used for the data passes that do not have AA otherwise.
Tweak these in the Compositor if you like, or disable them and do the old 2x resolution thing if you have to. (See Tips)
EEVEE’s SSAO is using overscan so that image borders wont “bleed”, since it’s a screen effect it would just fade out on the borders otherwise. Note: You still have to make sure there is mesh geometry outside the borders too, for better tiling.
Resolution
Change the render output pixel-sizes here. This will also affect the reference object proportions, for better reference.Pick from the preset buttons or enter a custom X & Y resolution. You can use a non-square resolution (e.g: 512x1024), but, power of two only & seamless tiling (above) may not work well/at all.
4. Connect AOV Outputs
keWT uses AOV (Arbitrary Output Variables) outputs for Color, Roughness and Metallic, as there is not really any other choice for layers not included in the default passes. (Light/Diffuse is not just material colors!).This is done automatically in the setup phase (you can disable it in add-on prefs) but;
All materials *added after setup* must have AOV setup manually (otherwise, they will still render, but Color, Roughness & Metallic will be black/broken). There will be a warning notification for materials without AOV.
The button automates the procedure to hook up all the output nodes in the materials.
If no nodes are used, value nodes duplicating the settings will be created:
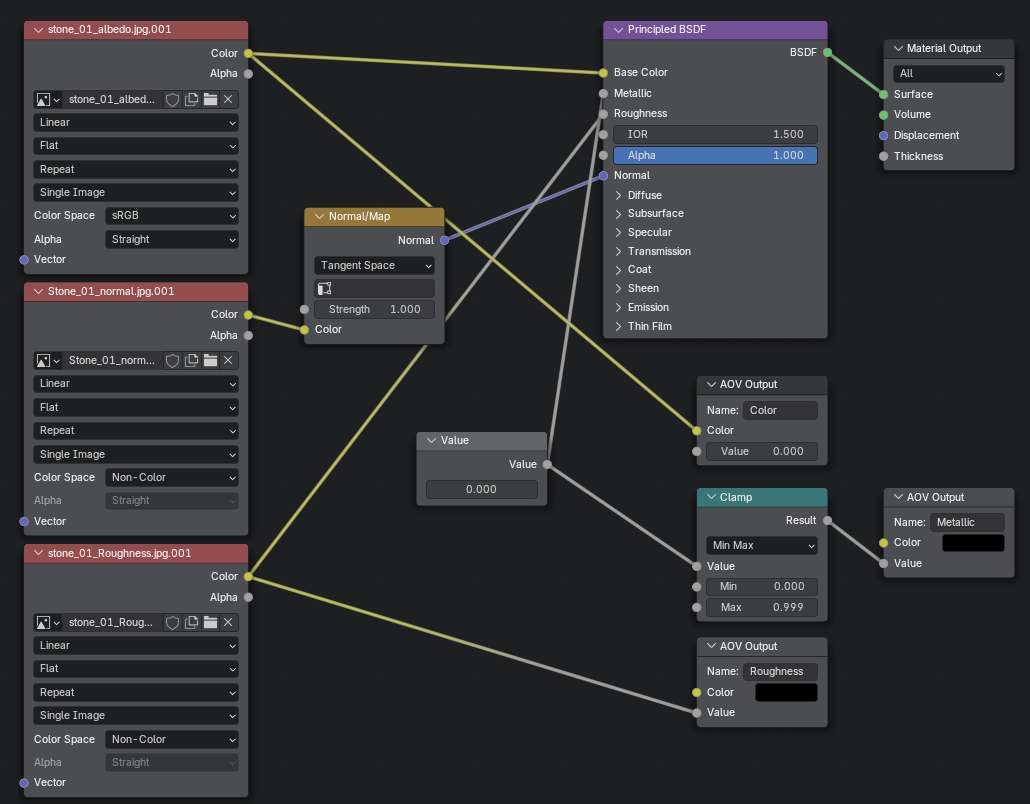
Note: The 0-0.999 Clamp for Metallic AOV is needed to avoid making the color-pass 100% black if set to 1.0.
This 1.0 behaviour is undesirable when making textures - but it is not considered a bug, so it will not be "fixed".
However, 0.999 still converts to 255 (100%) when rendered to 8-bit texture and keeps the color-pass intact.
(The clamp work-around setup is part of the automatic AOV process)
If you don’t need Color, Roughness and Metallic outputs, you can skip the AOV setup (& just ignore warnings).
5. Render
Use when ready to render-bake! This button is a custom render operator that is necessary for keWT to operate properly:!!! Do not use the standard Blender rendering operators/shortcuts !!!

Resulting render output files, shown in the Nemo file manager (Linux Mint)
Preview Object
Once you have rendered your outputs, you can use the "Make Preview Object" operator. This creates a tiling-preview plane with a material with all (usable) render-outputs connected.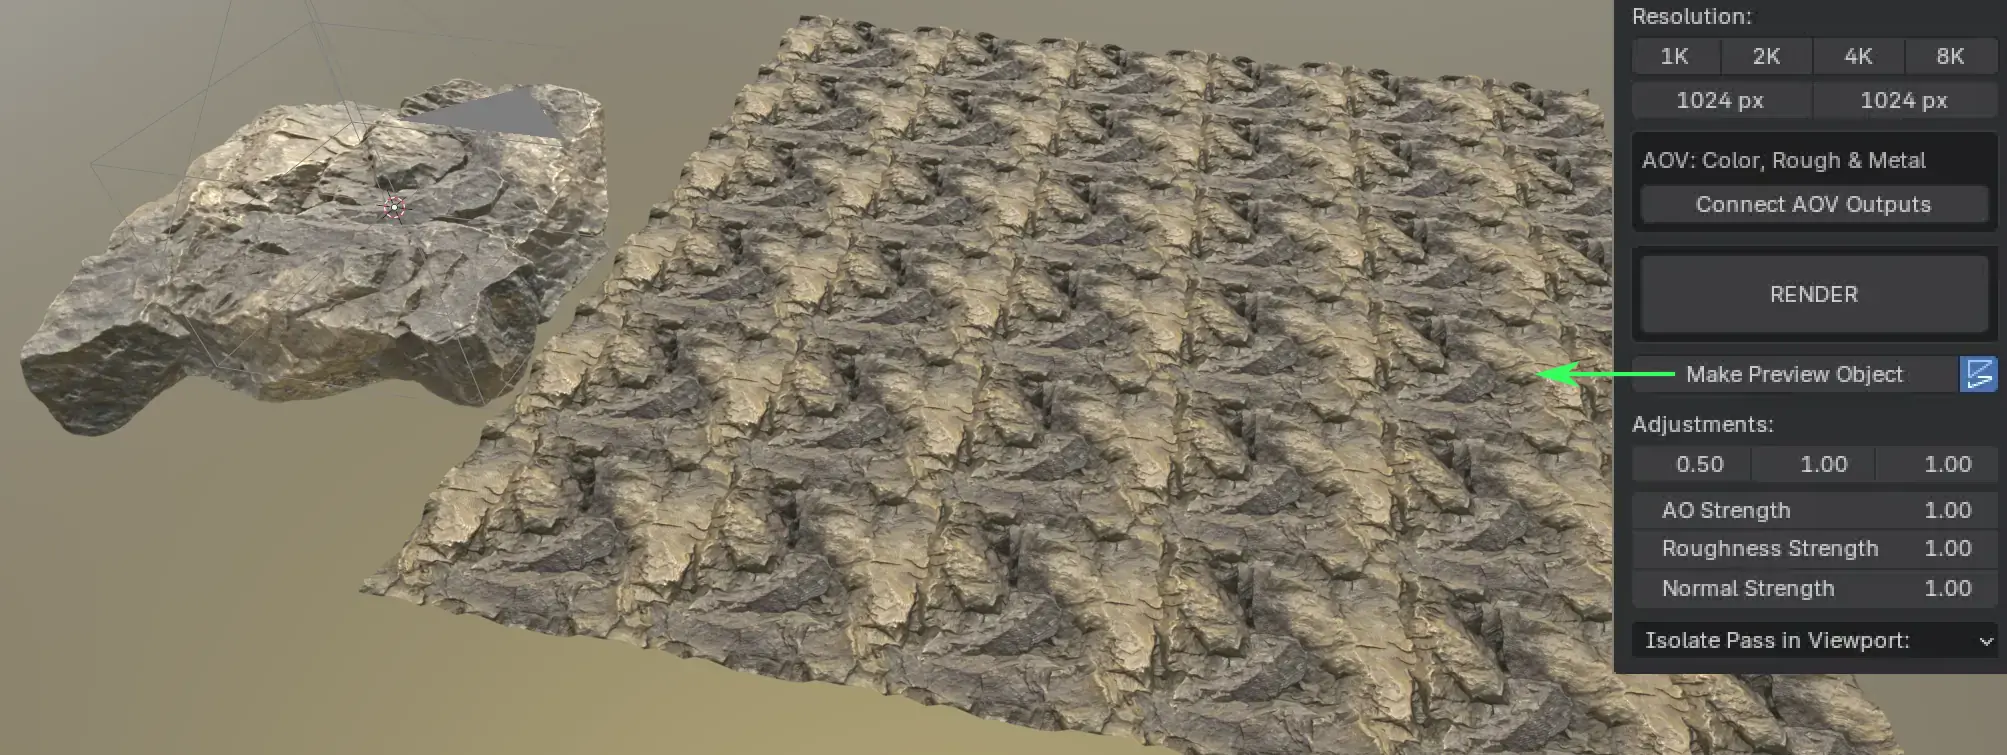
- Best used in 'Material Preview' mode in the viewport
- The preview object is excluded in the render pass
- The preview object is automatically updated (texture reload) after each render.
If you change things that affect the size (etc.) you can just run the op again manually.
(There is an option to disable the automatic reload behaviour in prefs if needed)
Displacement Option
This toggles using the height output (if available) in the viewport. This uses subdivision (and array) modifiers for a rough preview. Presets can be set in add-on prefs. There is currently no Parallax occlusion mapping (POM) alternative.
Adjustments
These output tweaks will only affect the viewport preview material (NOT the Compositor settings). (since v2.52)

- Remember: These adjustments are just for previz purposes!
Isolate Pass (in Viewport)
Isolate pass shows the preview object's preview material's render outputs as unlit shading in the viewport:
("Full BSDF" restores the full material shading output. Note: Isolate only works for the preview object.)

6. Compositing
File Output Setup
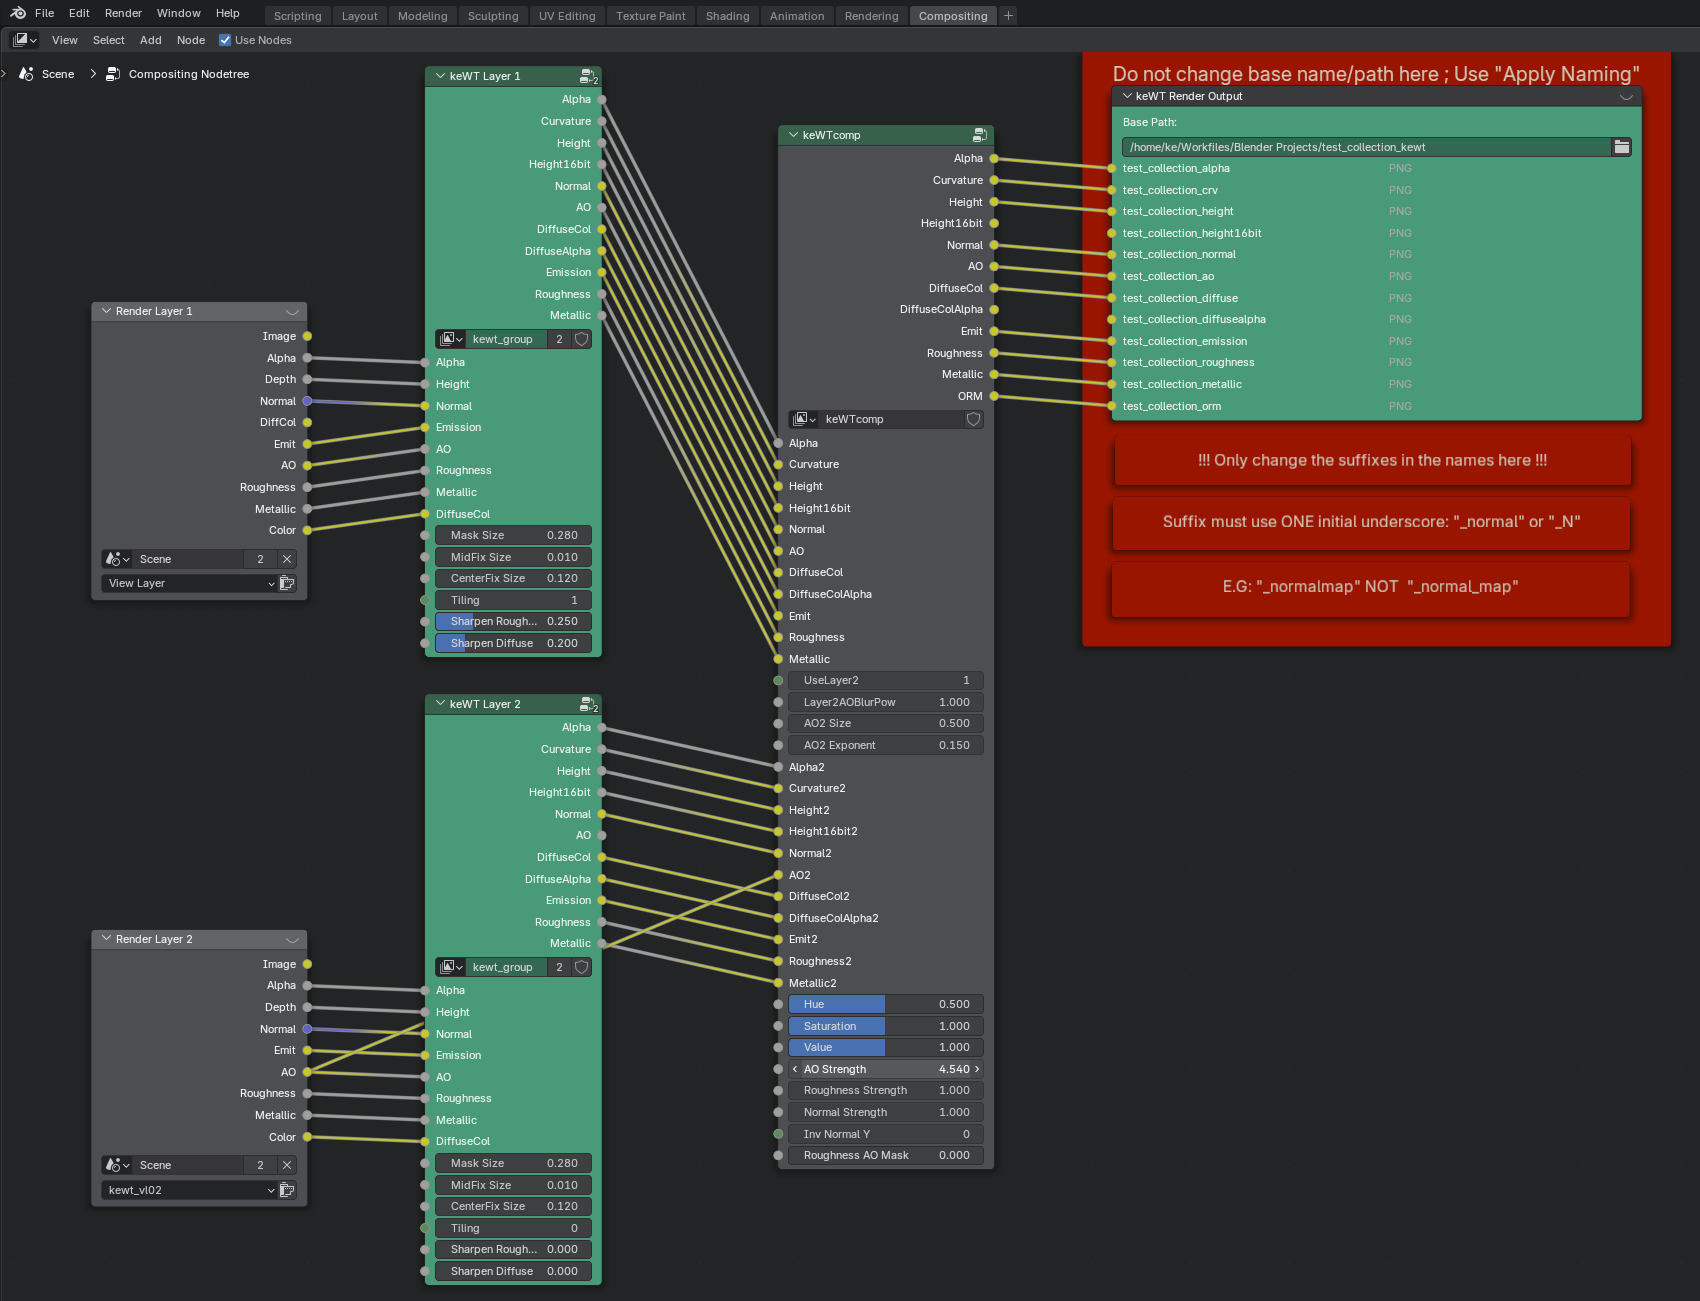
Here you can adjust what files should be output and how they will be suffixed.
Reminder/Tip: Use the View node for previews of outputs while tweaking settings!
- To change "defaults" - edit the keWT default blend file. Otherwise changes are per project-file
- Link/Unlink nodes from the keWT Comp group to the keWT Render Outputs as needed
- Do not change passes in the standard Blender Properties > View Layer Properties / Passes
- The output paths and naming should not be changed here, use the keWT operators in the panel
- Change suffixes in the keWT Render Outputs node. Changing “_normal” to “_n” etc.
- keWT needs the last underscore to be before the suffix. Do not use underscores IN the suffix:
Valid: "lorem_ipsum_normalmap"
Invalid: "lorem_ipsum_normal_map"
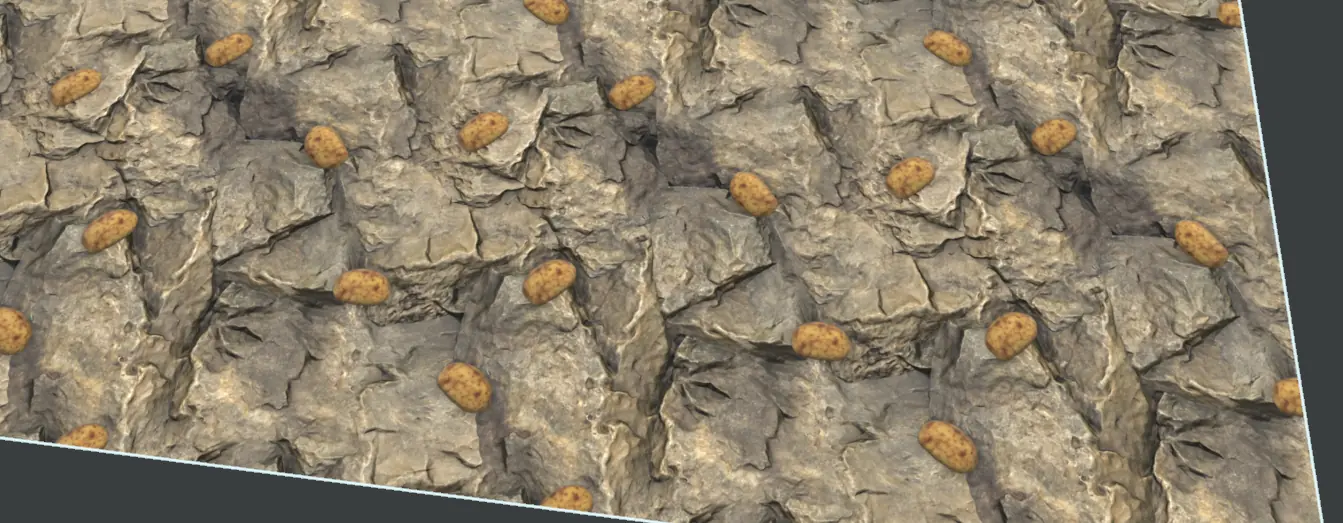
Seamless Tiling
keWT uses a simple "Cross-Offset" variant for tiling (with some corner case patching). In principle: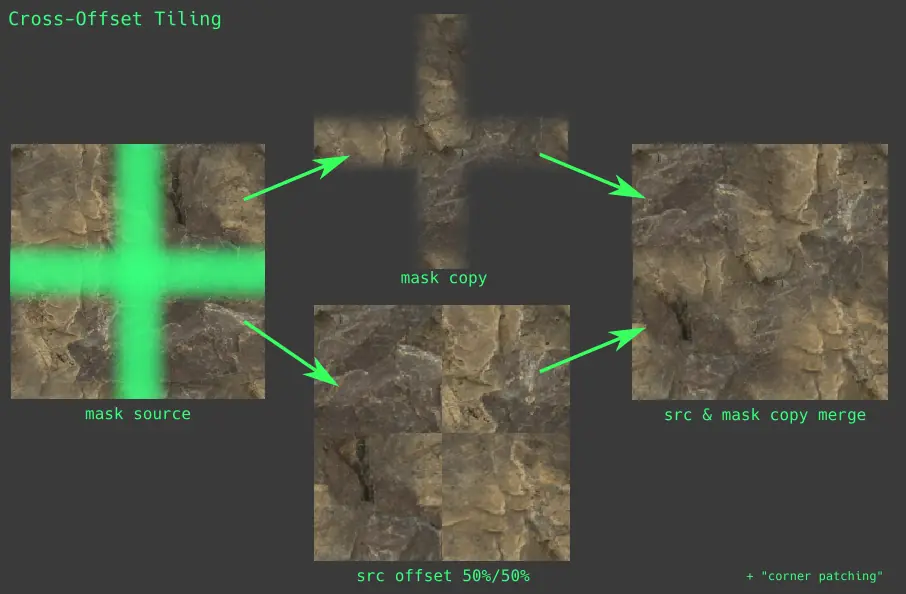
- This method works well for organic/noisy textures (without distinct patterns/features like bricks, panels, etc.)
- For a combination solution you can use the Layer 2 method, for manually tiled items
- You can adjust the cross offset variables in Compositing (it will not help in the fading potato cases)
Note: if possible, manually placing objects to ensure tiling will always be the best method to ensure exact results.
Objectile might help make object tiling easier.
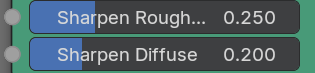
Sharpen
Sharpening filters are available for the Color and Roughness outputs (for both Layer 1 & 2). Default values are recommended, especially for lower resolutions (<4K) and when using seamless tiling, as it can have a softening effect.
Layer 2 objects use a "fake ambient occlusion" approach (an "outer glow/drop-shadow" effect) -
since the Layer 1 objects are masked out in layer 2. This effect can be adjusted in the compositing variables:

Note: Automating (some kind of) setup just for Layer 2 AO is TBD (not planned).
Curvature Output
keWT (since version 2.0) uses a "smooth(er) gradient curvature", which is much more useful for masking purposes:
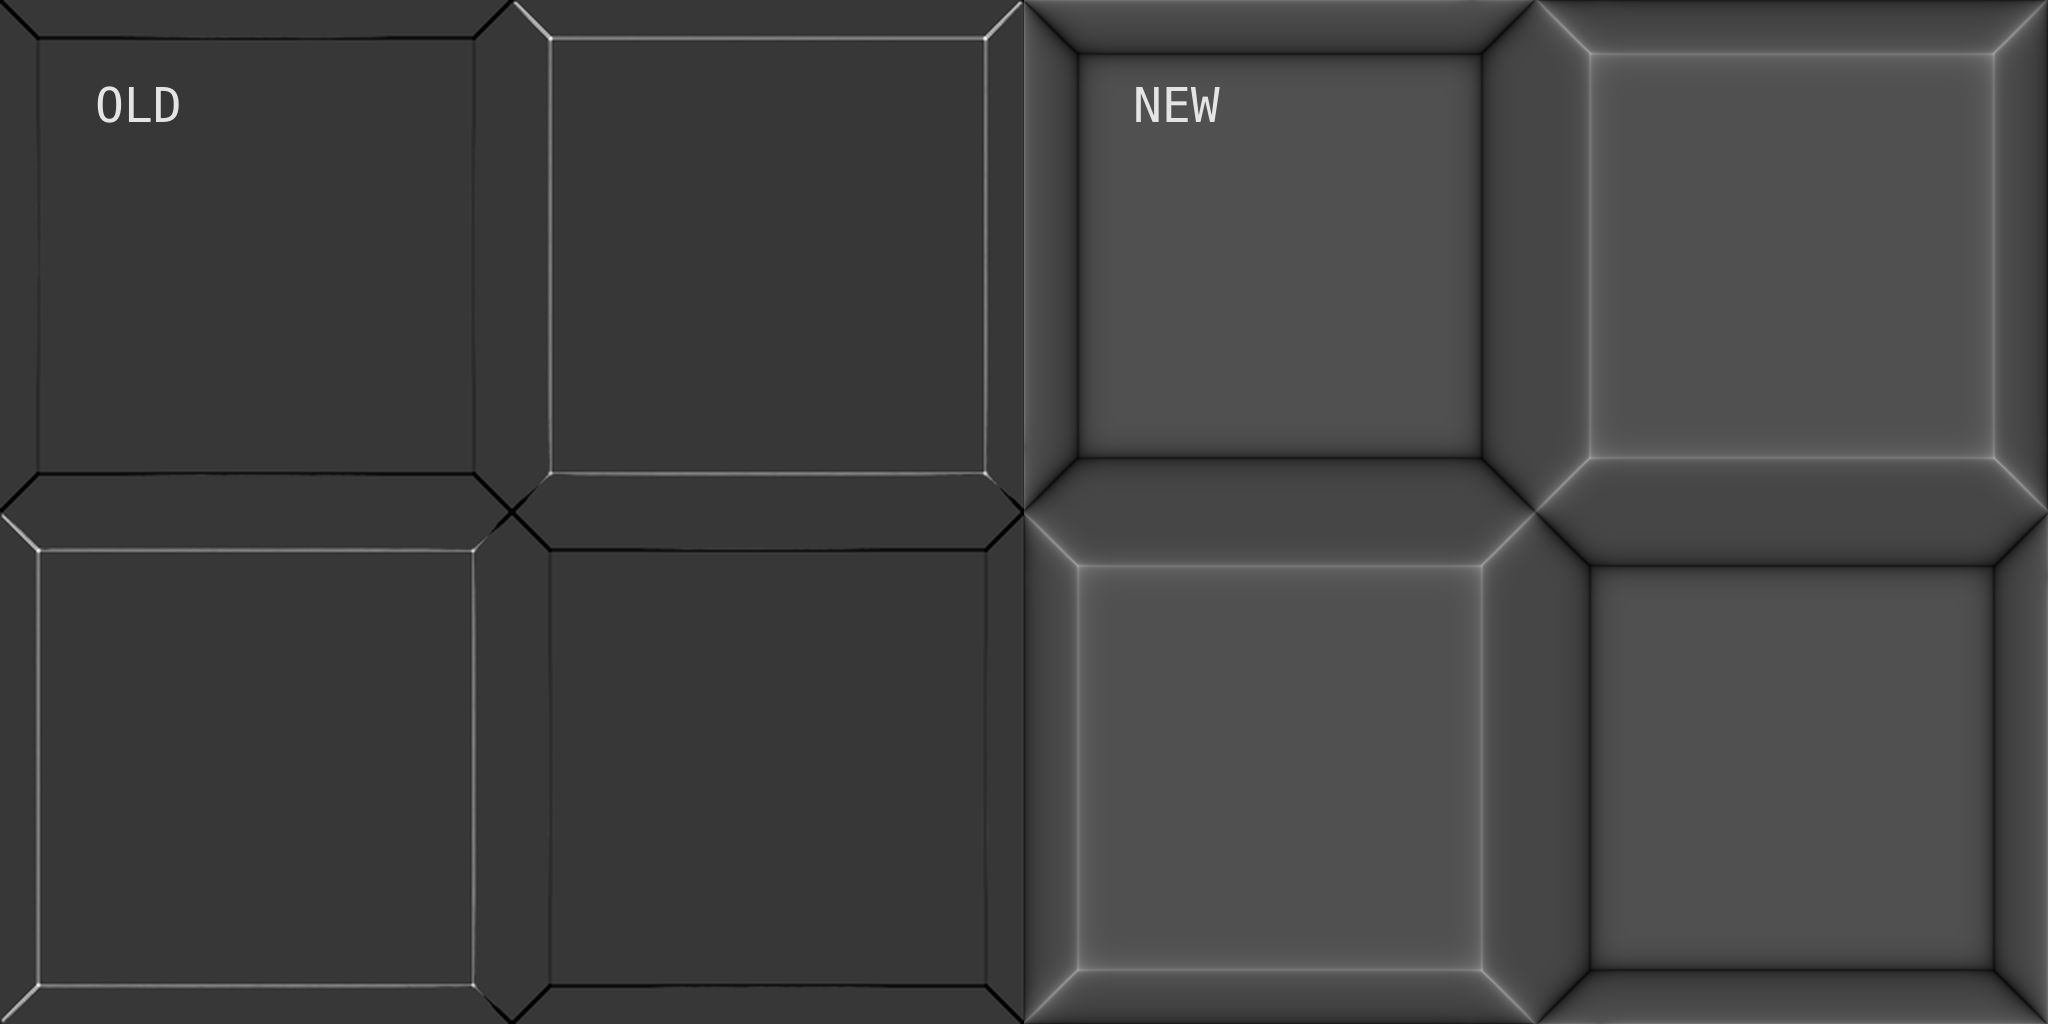
Note: Not the same geometry being used for left & right in this image - just general visual reference
Separate outputs for convexity and concavity is not planned currently.
(You can probably mod the curvature output fairly easily in the default blend file, to suit your particular needs.)
Channel Packing Output (ORM)
This combines the Occlusion, Roughness and Metallic outputs into the Red, Blue and Green channel of a single texture.
This setup is made to align with Godot. Feel free to modify the keWT default blend file yourself as needed for alternative channel packing setups. Note: This might make the 'Isolate Channels' feature incompatible - unless you rename _ORM and also include the separate outputs.
Other Compositing Variables
Most of these are self-explanatory with basic rendering & compositing familiarity.
Extra Tools
Objectile
Objectile makes object-level tiling possible by making the sides "match".This works best for lots of smaller to mid sized objects placed via physics simulation & similar randomized scenarios.
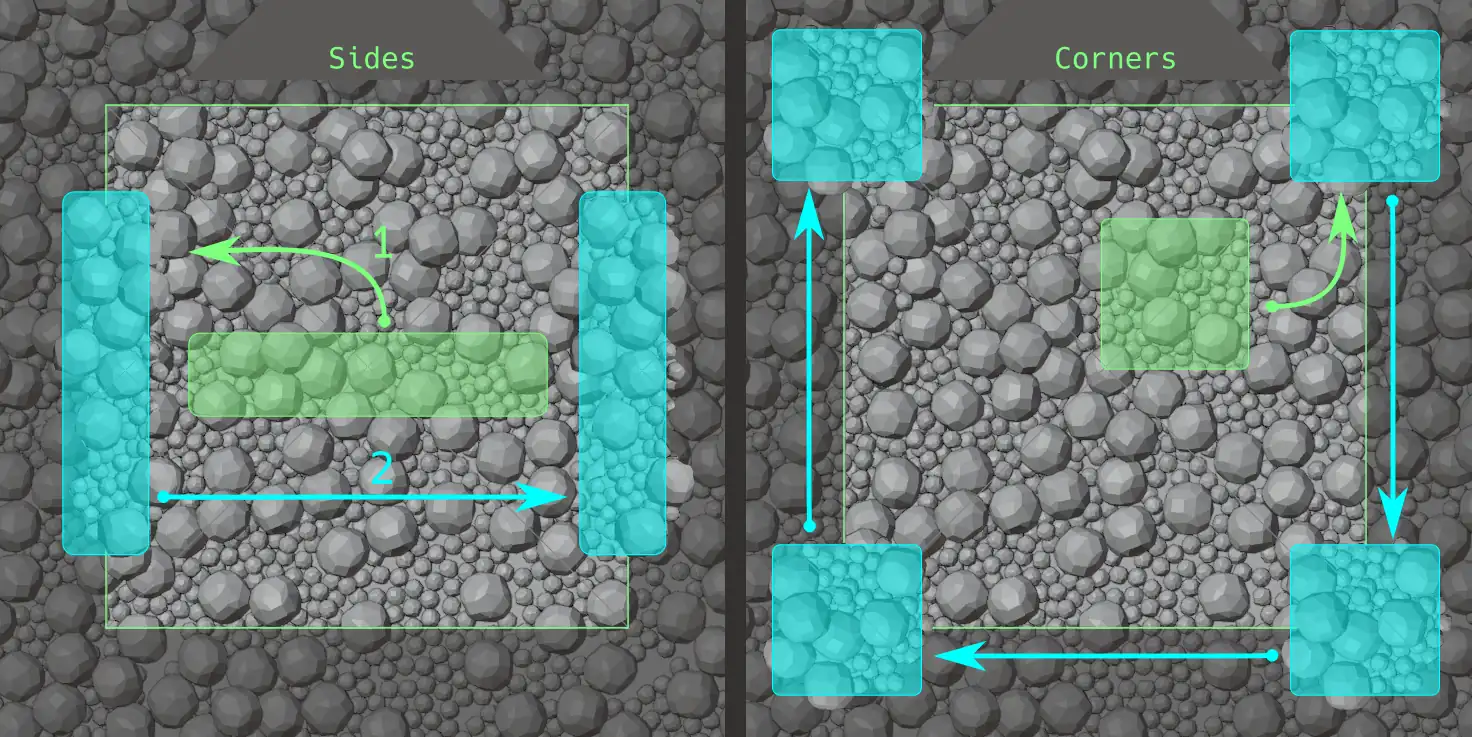
Objectile will sample the center (1) of the selected Collection, duplicate & rotate the selection 90 degrees (to reduce repetition) and place at the sides, left to right (2). And then similarly top to bottom. (Not illustrated; same principle.)
The corners' source area is sampled slightly offset from the center (to not over-sample the origo area) and also rotated 90 degrees before duplication for all the corners.
The "target areas", where the new duplicate objects are placed, are "cleared" of objects to make room. Some overlap may still occur (the "Find Overlap" tool might be useful in some cases)
The redo panel has options to tweak sample areas, target areas and rotation (flipping -90 degrees to 90: whichever might look best).
Tip: Change values in small steps. And don't forget to make sure Seamless Tiling is OFF! (if in Layer1)
Note: Objectile will not work for non-square areas.
Objectile will only work for collections arranged on X & Y, as in the keWT setup. Z-axis is ignored.
Find Overlap
This tool uses a simplified (fast) overlap detection, just using the bounding boxes of the selected Collections' objects.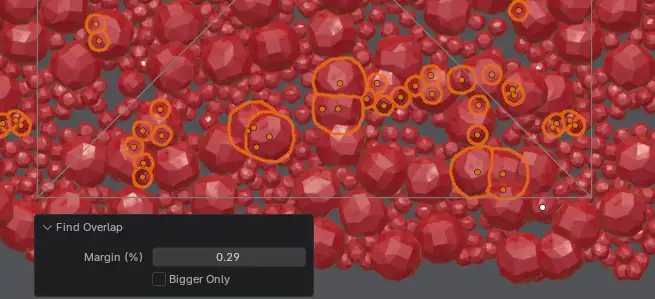
While it will not be pixel perfect, it is still useful enough for detecting objects that are severely overlapping.
The detected overlaps will be selected for you to do with as you choose (scale, delete, move etc.).
The redo panel has options for margin ("overlap sensitivity") adjustment, and an option to only select objects larger the average.
Tips
Customize the Default Scene
Treat the keWT default scene like your Blender default scene. Customize defaults to your liking; file name suffixes (as mentioned above) as well as outputs, file formats, resolution etc.You can also tab to enter the keWT Groups and customize anti-aliasing values (and whatever else you feel comfortable messing with), or removing them altogether should you prefer the old 2x render resolution method.
Tiling
While automatic seamless tiling is neat - perfect tiling may still need some manual touches: Use instances/linked duplicates, or just simple matching geo, around your mesh (as needed) to ensure AO pass is continuous, and not have dark borders or other tile-breaking results (which are likely to occur otherwise).Geo-Nodes / Custom Shaders
Not tested, but should be a great fit, making such a keWT setup even more substantial.Displacement Maps
Use Cycles. There might be banding issues with EEVEE (though EEVEE Next might have fixed/improved the banding), and Adaptive Subdivision, crucial for high quality displacement, is only available in Cycles.Update: No longer in the 'experimental feature set' in Cycles render properties, as of November 2025 in Blender 5.0!
Material Settings for Displacement Objects:
More of a general tip, but;
Remember to check that the option under Settings / Surface is set to "Displacement Only". Or both, but not just bump.
(Needed when using Adaptive Subd Shader Displacement!)
[EOF]